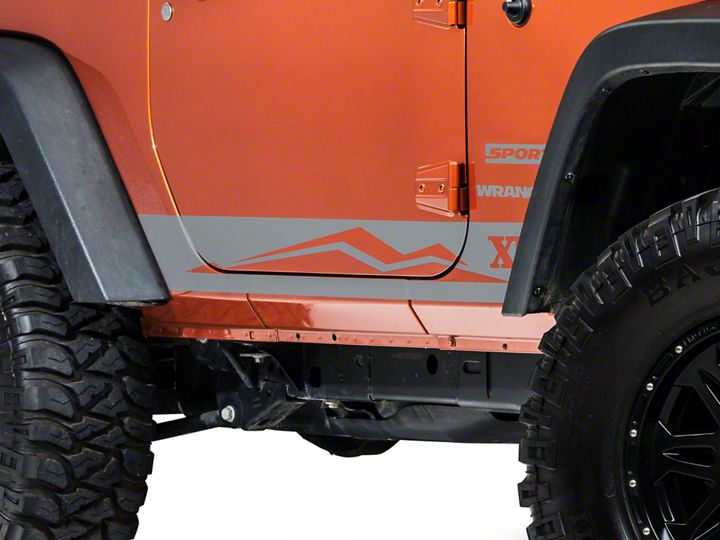

How to Install XT Graphics Rocker Panel Stripe w/ Logo, Silver on your 07-18 Jeep Wrangler JK 2 Door; 2018 Jeep Wrangler JL 2 Door
Installation Time
15 minutes
Tools Required
- Spray bottle with soap & water mixture
- Plastic Squeegee
- rocker-panel-decal-black-jk-j100701
- rocker-panel-decal-silver-jk-j100702
- rocker-panel-decal-black-jk-j100703
- rocker-panel-decal-black-jk-j100704
- rocker-panel-decal-silver-jk-j100705
- rocker-panel-decal-realtree-jk-j100706
- rocker-panel-decal-realtree-jk-j100707
- rocker-panel-decal-real-tree-tj-j100949
- xt-rocker-stripe-logo-matte-jk-j26020
- xt-rocker-stripe-logo-black-jk-j26021
- xt-rocker-stripe-logo-silver-jk-j26022
- xt-rocker-stripe-logo-matte-jk-j26023
- xt-rocker-stripe-logo-black-jk-j26024

Shop Parts in this Guide
Prep:
Clean car well to ensure good adhesion of the decal. Fill a spray bottle with a mixture of water and soap (we use baby shampoo), about 4 large drops per 32 oz. spray bottle of water. Be sure to install decal out of direct sunlight. Also having someone to assist you if you can is very helpful. It may be necessary to separate multiple decals on one sheet by cutting with scissors.
Step 1:
As you peel the transfer tape and vinyl off the backing spray rocker panel with a generous amount of the soap and water mixture. You are using a wrapping cast. It isn't necessary to spray the car and the vinyl just the vinyl. Alt-hough possible to install dry it will be very difficult for alignment.
Step 2:
Apply stripes to rocker panel area. You will be able to maneuver the strips into their final positions once on the car because of the soap and water mixture you sprayed earlier. If sliding the decal is difficult you can carefully peel back the decal and spay more solu-tion.
Step 3:
Align door gaps with the spacing on the decal. Align the front edge and back edge with the body lines near the wheel. One note for align-ment for the rockers with XT mountains in them is the low-er part of the door gap goes through the mountains.
Step 4:
Once you have the stripes in their final position, use the plastic squeegee to push any air bubbles out to the edges of the stripes. It is easier to remove bubbles by squeegee-ing from the center out to the edges.
Step 5:
Once the stripes are squeegeed and flat spray the transfer tape with the soap and water generously, the tape then becomes a little bit more transparent. Re squeegee to ensure the stripes are flat. Let the tape soak a while this will soften the adhesive of the tape and give the stripes a chance to dry and adhere underneath.
Step 6:
Once you have all of the air bubbles out and stripes have dried underneath, slowly peel the transfer tape from the stripes. This may take some time to dry. The more solu-tion you used, the longer it takes. You may speed up the process by using a hair dryer to dry the vinyl. If you pull the tape and the vinyl comes too its not dry yet. Pull the tape as flat on the car as possible this will help prevent the tape from pulling up the vinyl. One trick that may be helpful is to place a squeegee on the transfer tape and peel it back against the squeegee while holding the squeegee down on the decal keeping it tight on the tape that’s being pulled.
Step 1:
Remove the bolts securing the flare ex-tension and remove it. Next remove the 3 bottom bolts securing the fender flares. This will give you access to place the material under the flare.
Step 2:
Clean surface you are applying the mate-rial to. You may use a commercially available cleaner designed for auto finishes. When it is time to spray the material peel backing from ma-terial exposing the adhesive. Spray material with a light amount of the soap and water mixture. Simply mist the material This will help the adhe-sive from not sticking right away till you get it in place.
Step 3:
place the material on the vehicle. On this product there is one hole in it to place over the bottom fender flare mounting bolt hole under the front and rear fender flares. Align the material to run level along the vehicle and use the bottom as a guide when aligning the material. Tucking the material under the fender flares.
Step 4:
Remount the fender flares. Also remount if desired the flare extensions. The material is not cut for those mounting hole in case these are not present on your vehicle or you choose to not rein-stall them. In the case that you would like them back on. Simply use an x-acto knife and poke through the center of the hole then with the tip of the blade in the hole using it as a guide cut in a circular motion to remove material for bolt clear-ance.

