Talk to a Tacoma Sales Tech
1-877-870-8556
M-F 8:30A-11P, Sat-Sun 8:30A-9P
Logo Image
St. Pat's Sale - Up to 50% Off! Shop Now>

Front CV Axle Shafts (05-23 Tacoma)Find parts that fit my vehicle

Item TT15761
Tacoma Sales Tech

Verify parts fit & get product recommendations

M-F 8:30A-11P, Sat-Sun 8:30A-9P

$0.00
22 Reviews
Our Price

$269.99 pair

Ship to: 43215
Please enter a valid US or CA postal code
We're sorry, zip can't be updated at this time.

Will this fit your Vehicle?

Select a different vehicle Help?
Update or Change Vehicle
    Create a list
    Add to New List

    Saved - View your saved items

    We're sorry. We couldn't save this product at this time.

    or use

      Product Videos

      (1)

      Merideth: If one or both of your axles has failed, and you're looking for a replacement set for your '05 or newer Tacoma, these Front CV Axle Shafts will be a great set to take a look into. Now, CV axles failing is actually pretty common, especially when adding a lift and throwing off your suspension angles, as well as just regular old wear and tear. Now, the boots sometimes can end up rubbing and ripping, which will throw grease everywhere, and allow debris to interfere with the joint itself, which can just damage it that much further. Now, this set will be a great solution as an OE-style replacement, that will up the durability and longevity compared to your factory axles, without breaking the bank for the Tacoma owner looking to daily drive, or even offroad their truck. These will incorporate a heavy-duty build, with heat-treated components, including the ball tracks, and is gonna come with stainless steel clamps, for a long lifespan.The axles will also feature neoprene boots that'll be more durable than the factory materials, and include moly grease and a grease shield, to reduce any premature wear. Not to mention, these will come with all-new hardware for your axles, so you don't have to worry or question about using any old components. Like I mentioned, these will be relatively affordable for a set of axles, coming in at roughly $250. Now, keep in mind that these are an OE-style replacement, so other more expensive options in the category may be for higher-performance application, like length and setups. Not to mention, direct factory replacements from the dealer usually will cost you a little bit of extra cash, and these will be an OE-style replacement, while upping the game when it comes to the bill. Nonetheless, if you're just looking for a durable and reliable set of axles for your '05 and newer Tacoma, then this is it.Install will be a three out of three wrenches on the difficulty meter, so I would recommend tackling this if you do have some experience to do it, and it should only take you roughly four hours to get the job done, two hours on either side. Now, speaking of the install, one of our customers here will show you a step-by-step process on how to get the job done. That wraps it up for me. Let's go ahead and get into the install.Man: All right. Welcome, everybody. And today, I'm gonna be showing you how we can replace the CV axle on a second-generation Tacoma. That's 2005 to 2015. So, let's get started by showing all the tools that we're gonna need.Okay. So, here are a few of the basic tools that you're gonna wanna have. First off, as far as safety goes, you're gonna want some safety glasses and some gloves. Probably some gloves, because protecting your knuckles. And also, if you're replacing a broken CV joint, most likely it's because it failed, and there's gonna be a lot of grease, so gloves are definitely helpful. Then, you're gonna want a metric socket set, because we're working on a Japanese vehicle, so metric is the sizes. We're gonna need a 21-millimeter for the wheels, lug nuts, at least on my truck. It may be different on yours. And then, deep sockets, I would say it's gonna be easier if you have a 19-millimeter and a 17-millimeter as a deep socket. You might be able to do it with the regular ones, but it might be easier with these. You're also gonna want a pair of pliers, just a regular pair like that, and then maybe some vise-grip pliers as well. Not necessarily required, but could make life easier for you.And then the most important socket you're gonna need is this big one, this 35-millimeter, and that's for the axle nut, to loosen that axle nut up. And that's gonna be where you're gonna need your breaker bar. And also, probably to release the knuckle from the rotor assembly, is, you're gonna need that breaker bar. And, it's not required, but what's gonna make your life a lot easier is if you have a impact wrench. I have my cordless impact wrench right here, and that's gonna make my life easier, especially for breaking that axle nut loose. And then, we're gonna need a flathead screwdriver, or a cold chisel, a thin cold chisel. And we're gonna need a 17-millimeter and a 19-millimeter wrench. There may be more required, but we'll talk about those later as we go on. And then, and/or a rubber mallet and/or a regular hammer. And so, that's pretty much it for tools for now. If there's any additional ones, we'll go over them. Oh, and most important, one of the most important ones is a torque wrench. Now, the axle nut does need to be torqued backed down to, I think it's 178 foot-pounds. We'll go over that later, but, so, you're gonna need one that goes to at least 200 for this task, to get it torqued back down correctly when you're done.Okay. So, the next step is gonna be to jack up the vehicle. So, on Tacomas, on these second-gen Tacomas, there's a spot right here, right under the front bumper. This spot right here. You can set your jack on that, and it will...it's a good jacking point for that. So, let's get started with that. Don't pay attention to this front differential. That's another issue I have to fix. That's not part of this video.So, if you don't have a cordless or air ratchet impact wrench, you'll probably wanna loosen your lug nuts right now on your tire. But since I have an impact wrench, I should be able to do that with it off the ground. So, let's go ahead and get this jacked up. You'll see the spot where I'm going. Move your jack into position [inaudible 00:05:19]. Okay. So, now would be a good time, if you don't have an impact wrench or air ratchet wrench, you wanna make sure that you loosen your lug nuts up before you lift it off the ground, just so you can actually loosen them and not just spin the tire. But I do have an impact wrench, so I'm just gonna lift the vehicle.Now, there is a spot in the front that is easy to lift from, but I had to end up lifting it from back here because of a different issue right now. But you see this crossmember right here, part of the frame, is a good jacking point as well. So, before I start doing anything though, I wanna make sure I get some jack stands under here as well. So, I'm gonna put some jack stands right here, and on the other side as well. Now that there are jack stand here and there, I'm going to leave the vehicle on the jack, and those jack stands will act as a safety. Now, you can lower the vehicle onto the jack stands, but I prefer to do it this way. And then also, once I take the tire off, I usually leave the tire under the vehicle, as just some extra safety. So, do whatever you feel most comfortable with, and don't do anything if you're not comfortable with it.Okay. So, now I'm gonna start taking the lug nuts off the tire, and a magnetic tool tray like this one is gonna be really helpful to keep all of your parts organized. A larger one as well, but just for the lug nuts, I'm gonna use this. So, let's go ahead and start by taking the lug nuts off. That's a 21-millimeter socket, and it's usually good if you use a deep socket. It grabs the lug nut more. So, a deep socket is best to take these off. So, let's go ahead and take these off. And my impact wrench takes them right off. Now we can take the wheel off, kind of just hit it, and it comes off. Now, if it doesn't come right off like that, usually if you hit the bottom with, like, a sledgehammer or something, the weight from that should be able to get it off. And so, like I said before, extra safety of what I like to do is kind of slide the tire right under the vehicle, just to give yourself a little extra safety.Okay. For the next step, we're gonna disconnect the tie rod end from the rest of the steering assembly here. And so, you'll notice there's a cotter pin here in this castle nut. So what we wanna do is we wanna take our pliers and bend it, so that way the cotter pin is able to slide out. Straighten out these parts at the back as much as you can, and then grab it by the front, and can pull it out. And usually, see, if I hit it like that a little, it gives it a little more, and we'll wanna make sure to save this cotter pin, especially if you plan on reusing the tie rod.All right. So, next, we wanna take off this castle nut, and that's gonna be a 22-millimeter socket. And just leave it on there a little bit for when we separate the ball joint here. Okay. So, the next thing we're gonna be working on is getting this outer tie rod separated from the rest of the assembly here. So, I'm gonna be taking this castle nut off right here, and can use what's called a pickle fork, try to get under here, and kind of pry down. But I usually find that I end up tearing the boot, and end up having to replace the tie rod end.So what I'm gonna try to use instead today is a tie rod end puller. So, basically, this end will slide under here, and then I'll tighten this down, and it will kind of force it down and off. So, let's get started on that. Hopefully, I can get it under there. So, get it under the boot like that kind of, so that way it's there, and then start to tighten this down, so it sits on top of the other bolt's threads. And so, this particular one I have uses a 3/4 socket. So, then I put my 3/4 socket on here, and I start to tighten it down. Kind of fell off there a little bit, so just readjust it, re-tighten it. Make sure it's on there, and continue tightening it. You can see it moving, so you can see... I think it's off now, actually. It is. It's pushed it down and off. You can kind of give it a whack or two. This is where a hammer might come in handy. Whoops. And then, once it's outta the way, if you're not doing anything else with the tie rod, you can just leave it off to the side.Okay. So, another thing we're gonna do while we're right here is, on the back of our rotor here, we see this line coming down to this little connector right here, and this is for your ABS. And so, there's a little tab there that you could pry off with a screwdriver. Mine's kind of already loose, so I can just pry it off like that. And that's what the connector looks like. You see on... Sorry about that. This side, there's a little connector there, and that's kind of where you put your screwdriver, right there. And so, then you can set, you can pry up this other piece right here that is holding it in, if I can get it. You can kind of pry that up. And then you can release the cable completely, and then kind of just tuck that out of the way as well.Okay. So, the next part we're gonna try to work on is this right here. We're gonna try to disconnect this sway bar end link from the rest of our assembly here. That way, it will make it easier for us to swing this whole rotor assembly out of the way. So, you'll notice that on this end, there's a nut, and that's gonna be a 17-millimeter nut. And unfortunately, we can't just do that, because if you look over here, it'll start spinning. So what you need to get is you're gonna want a set of vise grips to kind of go in there, and then kind of see...kind of hold it as tight as you can. And you may have to mess around with it for a bit to get it to hold, or find a pair of vise grips that will fit in here. But once you do, once you find that pair of vise grips or whatever, to hold that in place, you can use this, and kind of break it loose. Let's see if I can't do that.Let me see if I have a better pair of vise grips. Okay. These ones might be too big. I don't know. Maybe not. These ones might be better, actually. This big set of vise grips. That's too loose. Have to tighten it up a little bit. It's finding that balance between what's tight enough to push down, and not loose enough that it's gonna just not work. Okay. So, now, we've got that pretty well held, and you see it broke loose. So, undo that, and make sure to keep track of all your nuts and bolts and what goes where. Just gonna undo that. And so, once that is loosened [inaudible 00:14:54] your vise grips, and the sway bar end link just comes out. And so, now that's out of our way and the sway bar is disconnected from our assembly, so that's out of the way.Okay? So, now we're gonna move on to removing the dust cover that's over the axle. And so, the way you go about doing this is either a thin cold chisel or a flathead screwdriver like this one here. Now, you do wanna be somewhat careful, because you don't wanna dent it a little bit, too much, like I have before, but basically just wanna go in there and work your way around, to pry it off. So, once you get a little bit started, you kind of continue to work your way around. You start opening up more and more of it, and it will start to come off easier. And so, this is a time where I'm noticing I'm not using the right tool for the job. See how long this screwdriver is? I'm not getting a lot of leverage, because it's thin. So I'm gonna switch to a different screwdriver and continue, instead of trying to use this improper tool. So, as we can see, this screwdriver, a lot shorter. It's gonna help me be able to pry at this a little better than the other one was. At least I think.So, basically, you're just working your way around the dust cap here, and working this cover off. I have done this a few times, so mine might come off easier than yours. It might be really stuck on there if it's been on there for a long time. This truck has about 200,000 miles. And there we go. And there's that off. Now, you'll notice what we have is the axle nut locking pin. So, there is a cotter pin right here, around this lock nut. And so, we wanna take our pliers, and we wanna bend this cotter pin. That way, it can be pulled out. And then we wanna pull out the cotter pin, like that. Then we wanna set our cotter pin back aside in case...but your new CV axle should come with one. And so, there we have that. And now we can go ahead and take this off.Now, if you don't have an impact wrench, this is probably what's gonna be most difficult, is you're going to have to find a way to stop the rotor from spinning while you break this nut loose. Now, I've seen people do it where they put a lug nut back on one of the studs, and they put a jack stand under it, and kind of use that. But I find that that usually just levers the truck up. But if you have it on jack stands, that might differ. So, it all depends on what your setup is, and how you're going about it. For me, though, if you do have an impact wrench, that is going to be what's easiest, so it can break it. Or, alternatively, if you keep your truck on the ground first, you take the dust cover off, if you're able to do so, you could do it while the truck's still on the ground. But just loosen it then, because you don't want the axle to be falling out while your truck's still on the ground. So, I'm gonna take my 35-millimeter socket, and my impact wrench breaks that right free.Okay. So, now we have our... This is the end of our axle. So what we're gonna do is we're gonna push it out. Actually, we're not yet, because we need to disconnect this rotor assembly, so that way, we can freely move it. So let's do that. So, now you'll notice these bolts right here. We're gonna loosen both these bolts on either side of the knuckle. And those are both 19-millimeter bolts. So, let's get started. So, I'll go on my first 19-millimeter bolt, right here, break it free. And then we'll also break free this second 19-millimeter bolt. And you'll see that what that does for us, it allows us to move this rotor assembly freely.Okay. So, you'll notice that now that we've removed the two 19-millimeter bolts that were connecting the steering knuckle to the rest of our rotor assembly, that we can now freely move this about. Now, we don't wanna move it too much, put stress on our brake lines or anything, so we do wanna be somewhat cautious, but this will give us the room that we need to push out our old CV axle. [inaudible 00:20:57] that. Kind of just push it out. And mine is pretty broken, so it kind of just falls out. Now, you won't have it this easy. You'll see that mine is broken. There is another piece back in here, back farther there, that we're gonna take a look at, and see how to remove that. But yours won't just pull out like that, but you will be able to push it back, and get the front part out. So, let's move on to removing the back part that connects to the differential.Okay. So, now that you've removed the front part, your CV axle, unless it's as broken as mine, will still be connected to this part. But this part goes into the differential. And so, here's another tool that I forgot to mention we'd be using today, is a pry bar. And we're going to be prying this out from the differential. There is a circlet that is holding the CV joint into the differential. So, that's gonna be what you're gonna be pushing against. So, let me get the camera set up a little better, so you can see a little bit more what I'm talking about. So, you see, this is where it connects into the differential. This is the differential right here. And you'll see this little space here, and that's where we're gonna be prying against. So, you wanna get some sort of pry bar in here, and kind of pry that away. You don't wanna use too much force. You don't wanna damage anything inside the differential, but you can use some force, so...Okay. So, now we have our pry bar in here. You can kind of pry against it. Actually, before I do this, I need to put a catch can below here because some differential fluid may leak out, so that's something we need to do. Also, this skid plate, depending on what bar you're using, it's kind of interfering with my prying, so we're also gonna take off this skid plate.Okay. So, now that I have my socket extractor on there... Oops. Go ahead, and that one comes right off. I don't have many bolts on this skid plate, because this truck does have 200,000 miles. So, there's one more on the other side, and that will be that. Okay. So now, moving this skid plate, and making sure that I have an oil or a catch can, making sure that we have a catch can beneath, so that way, any differential fluid that leaks out will be caught in the catch can, and not end up on your garage floor. So, with that skid plate removed, you can more easily pry at the differential. You may have to try a variety of bars to see which one fits best. I'm actually gonna try the pickle fork. That seems to give me a lot of leverage. Get it behind there. Pry. Just trying to loosen it, get it out of there. And I think it's coming now. Yep. Yep. See the differential fluid start coming out. It's a good sign that you're almost there. And there is the other end. And so now, you can prepare to get ready to install the new one.Okay. So now, with that out of the differential, you can see more of what you're fighting against is this little clip right here, inside this outer ring. And so, that's also gonna be fighting you to put it in. So, when you go to put it in, you kind of have to try to fit it in. If it's not going, back it out, turn it a little bit, and keep doing that until you get it in, and we'll get to that in a minute, because you don't wanna put too much force on it, otherwise, it could cause more problems. So, we wanna make sure that it's better. So, let's go ahead and compare the old part to the new part.And so, you know this, that it's a little beefier right here, so it's a little stronger. This one is upgraded for more durability, I believe, is why I'm buying it, is because I have a lift in my truck, and the extreme angles. So, that's with that. And here is our axle nut that it comes with. It comes with a brand new axle nut, and it also comes with the locking nut and the cotter pin. So, nice touches. Good to make sure that we have those, and I'm gonna get some calipers out and see if this inner shaft is any bigger, and we'll see how it is.Okay. So, both of the parts are pretty much the same size as... So, you wanna make sure that your parts are the same size, usually. I do notice that this part is a little bigger, and I'm assuming that's part of the increased durability of this part that I got. And so, hopefully, that helps with not breaking any more CV axles, especially don't wanna be doing that out on the trail. Okay. So, for our next step, we're gonna want to take the end of our CV joint, and this little circlip right here, we're gonna be fighting with it. So, it's easier if you can kind of, like, hold it in place, and kinda grease up this end with some automotive grease, kind of hold it somewhat in place, so we're not fighting it as much. And then, just kind of keep it [inaudible 00:27:36] Then you just basically try to slide it in. And this usually is a bit of a process [inaudible 00:27:54] a little bit, of just turning and finding where it fits. Because you shouldn't have to force it an extreme amount. It's important to get it perfectly parallel, so that way, it slides right in. That's what we're trying to do. Feels like it's gonna go, but then it might not. That's what seems to happen to me quite a bit. And there we go. It is in. So, now that we have that in, we can start working on reassembly.Okay. So, now what you wanna do is you wanna take this end, and you wanna take the rest of your rotor assembly. And you wanna fit this in through here, and make sure that the splines line up. You gotta kind of get it even. Even as possible [inaudible 00:29:40] that's not going in. So I gotta line it up, take it out, move it, and re-line it up a little bit. So, it goes in like that. There is that. And next, we can work on reattaching our sway bar end link. So, to do that, you may have to push down on your upper control arm a bit there, push that back through, and then find your bolt, that you definitely didn't misplace. And then screw that back on. Tighten that bolt back down. So, now that we've put our nut back on, we wanna do the same thing we did when we were taking it off, just reverse. So, reinstalling it is. So, that's not...that's over it, not on it. Okay. So, if I can get these vise grips to cooperate with me, you're gonna wanna hold this on the end again. What's going on here? Like that. And then you can put your socket on the other end, and tighten that down. There we go.So, the next step, we'll reattach the steering knuckle, which can be a bit tricky. So, I'll help you guys with that too. All right. So, my jack is a little...it's not reaching, so I put this block of wood under here. And again, raising this knuckle up to get it closer. And what this is doing is just bringing it closer. That way, you can thread this bolt in easier, right here. So, you've just gotta get these two lined up, if you can. Now, this is...it seems like it should be really simple, but it usually is not. Takes me a while usually to get 'em threaded. Okay. So, there's that one, I believe. Get our 19-millimeter socket on. See, yep. I thought it was threaded, and it isn't. So, this is the part I struggle with most putting this back together. Okay. There's one in. Find the second one. This is why it's a good idea to have all your parts organized, so you're not just running around looking for each and every one of them every time. So, you may have to adjust this as well, so it's a good idea to keep this a little bit loose. Loosen this one up a little. Loosen that one up a little. That way, you can still move this one a little, because yeah, I can see this needs to go this way. Then get that one started. And then we'll get out our torque wrench and torque them down.Okay. So now, we have our torque spec for these. I looked it up. It is 118 foot-pounds. So we're gonna take our torque wrench, we're gonna set it to 118, we're gonna lock it. And we're gonna take these bolts... And I don't want the tire to be spinning like that. Okay. So, to reconnect our tie rod end, you wanna take it, and you wanna put it up through the hole, same way we took it out, and you wanna take our bolt, our castle nut, and we want to just put it on like that. And then we can take our 22-millimeter socket, and we can tighten it down. I have an impact wrench in this case. Just wanna tighten it down so... Oh. Not that much. And then we want to leave a little space right here. You see how there's openings here? You wanna leave one spot open, so that way, we can slide our cotter pin through. And usually, it's... Okay. That's just bending it. So, we wanna take our cotter pin. I'm gonna kind of start to slide it through, and can take a hammer, tap gently, kind of help it the rest of the way through. And then, once one side is through, you can take a pair of pliers, and you can kind of bend the sides out to the side, so that way, the cotter pin isn't gonna pull itself out by any bumps or anything, just to be safe. And there, your tie rod end is reattached. So, let's move on to the axle nut.Okay. So, now we wanna put on our axle nut here. So, kind of start to thread that on. This is included with the CV joint. So you don't have to reuse your old one, which is nice. It's always nice to replace the hardware when you're doing something like this. And then, you can tighten it down most of the way using either your ratchet or, in my case, impact wrench, getting it pretty tight, but we will torque it down as well. So, then, after you've gotten it pretty tight, where you think it's close, to torque it down, it does need to be on the ground. So, we're gonna put this on after we torque it down. So, let's put the wheel back on, and set it on the ground, and then torque this bolt down.So, if you did jack up your lower control arm, now would be a good time to release that, kind of let everything settle. And one more thing. Before we put the wheel back on, we do wanna make sure to remember to reattach our ABS sensor that we disconnected at first. Good thing I saw that. Because you could do it with the wheel off probably, but it's much easier just to do it like this, and you push it in, and then you'll be good. Connected. And you can run this cable back up to the top here, where we disconnected it from. Put it back in that little channel spot, just to kind of keep it where it's supposed to be.Okay. So, now, let's torque the wheel down, I mean, the axle nut down. We're gonna put the wheel back on first, and then set the truck on the ground. So, it is important to note that if you have a stock Toyota Tacoma tire, you should be fine. You just take off the center cap, off the wheel. But if you don't, you may have to figure out a way to torque the axle nut down while the truck is on the ground, because this allows access. Okay. So, I'm gonna put my wheel back on, line it up, get at least one lug nut started. Just kind of hold it on there. And then you can start all the other ones on. Make sure that if you have an impact wrench or not, you always start the lug nuts by hand. That way, you don't risk cross-threading them or anything like that. It's always best to start them by hand. Okay. There's that. And then we're gonna take our 21-millimeter socket and get those on there tighter. You also always want to tighten down lug nuts in kind of a star or crisscross pattern, not all in a circle. Okay. That's good enough to be lowering the truck down, so let's lower the truck. Make sure that you get your jack stands out of the way, and anything else that's out of the way. Actually, I see I need to move a jack stand over there.So, with all your jack stands out of the way, you can go ahead and slowly let the truck down onto its own weight. And once it's on its own weight, that's good. Then we can take our 35-millimeter socket, and then, the torque spec for this is 173 foot-pounds of torque. So you're gonna need a torque wrench that goes to at least 200. So, there's 170, 1, 2, 3. And then lock it. Now we can put it right on the axle nut. Actually might need an extension for this. My extension. And there it's torqued down. So now, the next step is to take our lock nut and cotter pin, and put those on. Take this locking nut, and place it, so that way, you can still slide this cotter pin in, and then you can kind of slide the pin in. Probably be a little difficult, but, again, using a hammer to help kind of get along. And then we're gonna do the same thing we did with the tie rod end, is wanna take these ends, and with a pair of pliers, and fold them out, so that way, they can't move on us and pull out on their own. And then the next step is to take our dust cap, and we wanna fit that back on, and tap it in with a hammer. It's probably best to use a rubber mallet for this. Basically, just wanna go all the way around until you can see that it's seated properly around. And finally, if you have a center cap, reinstall your center cap.And then also, one important thing to note. If a substantial amount of differential fluid did leak out when you pulled out your CV axle, you'd wanna make sure that you replenish your differential fluid as well. So, that's something to keep in mind as well. And then we also wanna make sure that once the wheel's back on the ground, we also, one more thing we wanna torque down is our lug nuts. And so, I usually torque those down to around 100, not, between 90 and 100 foot-pounds, is a safe number for that. And then, again, you wanna go in a star pattern. Hear that click. That one's good. That one's good. That one's good. And that one's good. And that one's good. So now, we are done.Merideth: So, that is going to wrap it up for my review and the install of the Front CV Axle Shafts, fitting all 2005 and newer Toyota Tacomas. For videos and products just like this, remember to always keep it right here at extremeterrain.com.

      View Full Transcript

      Now Playing

      2005-2022 Toyota Tacoma Front CV Axle Shafts Review & Install

      2005-2022 Toyota Tacoma Front CV Axle Shafts Review & Install

      44:25

      Subscribe: New Tacoma videos daily!

      Subscribe to our YouTube Channel

      Product Information

      Features, Description, Reviews, Q&A, Specs & Installation

      Features

      • Designed for Street and Off-Road Use
      • Crafted from Heavy-Duty Materials
      • Heat-Treated for Extra Durability
      • Includes Neoprene Boots and Moly Grease
      • Comes with Heat-Treated Ball Tracks and Stainless Steel Clamps
      • Installation Requires Mechanical Expertise
      • Designed for the Front
      • Sold as a Set – Driver and Passenger Sides Included
      • Carries a Limited Lifetime Warranty
      • Fits All 2005 to 2023 Toyota Tacoma Models

      Description

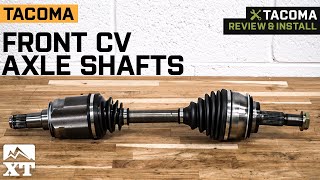
      Efficient Wheel Power. Ensure your safety while improving your Tacoma’s performance by using a new set of Front CV Axle Shafts. These components are perfect replacements for the stock parts and provide a strong, reliable connection of the wheels to the gears in the transmission. Keeping your axles in excellent working condition allows efficient power transmission from the drivetrain to the wheels for a safer and bolder driving experience.

      Long-Lasting Toughness. These Front CV Axle Shafts feature heavy-duty construction that has passed rigorous testing to ensure maximum durability and outstanding performance. Each shaft is furnished with neoprene rubber boots that offer reliable protection against the elements on and off-road conditions. The assemblies feature precision machined components and heat-treated center-shafts and ball tracks. Moreover, the CV joints are equipped with high-temperature, high-performance moly grease for efficient operations.

      Professional Installation. Engineered as direct-fit replacements, these CV Axle Shafts install at the factory mounting locations without drilling and welding. Installation completes with mechanical expertise required.

      Application. These Front CV Axle Shafts are intended for use on all 2005 to 2023 Toyota Tacoma models.

      Fitment:

      CA Residents: WARNING: Cancer and Reproductive Harm - www.P65Warnings.ca.gov

      Installation & What's in the Box

      Installation Info

      Installation Time

      (approx) 4 Hours

      Difficulty Level:

      Mechanical expertise or professional installation required.

      Installation Guides

        No guide available for this part yet.

      What's in the Box

      • (2) Front CV Axle Shafts
      • Installation Hardware
      4.5

      Customer Reviews (22)

      Customer Photos featuring this product

      View All

      Review Summary

      4.5 out of 5 overall ratings from 22 customers

      Installation Time: Afternoon

      Oct 24, 2024

      5
      2016 TRD Off-Road - Brit33
      Installation Time: Afternoon

      Axles

      If you’re looking for a beefer axle this is it and for the price! I will say these are a little tricky getting them in place. Toyota stock axles have actual notches to lightly tap the axels in snd out of place. these axles do have a notch, but it’s not as defined or as long as the stock takes a little more time getting in be patient it’s worth it.

      Fit 5/5
      Quality 5/5
      Bang For Your Buck 5/5

      Oct 22, 2024

      4
      2016 TRD Sport - Adelawder
      Installation Time: Afternoon

      Cv Axle Shafts

      I’ve recently bought a 2016 Tacoma and had original cv axles at 160k miles. Already put close to 1k in the last month. I am disappointed in discoloration this soon. I don’t know if that is normal? Did take it to the beach already, could be from natural elements. Happy so far, time will be the true test.

      Fit 4/5
      Quality 3/5
      Bang For Your Buck 4/5

      Jun 8, 2024

      5
      2018 TRD Off-Road - Michel1425
      Installation Time: Afternoon

      Axle

      More than a month no issue good quality fits perfect

      Fit 5/5
      Quality 5/5
      Bang For Your Buck 5/5

      May 18, 2024

      5
      2008 Base - RickVern
      Installation Time: Afternoon

      Quality part

      This part its great quality and slightly more robust than stock. Recommend

      Fit 5/5
      Quality 5/5
      Bang For Your Buck 5/5

      Feb 19, 2024

      5
      2007 Base - DFTF
      Installation Time: Less than 1 Hour

      Front CV Axle

      Great and sturdy product. Will always buy from extreme, for my 2007 Toyota Tacoma

      Fit 5/5
      Quality 5/5
      Bang For Your Buck 5/5

      Feb 5, 2024

      5
      2017 SR5 - Barstowm
      Installation Time: Afternoon

      Perfect

      Replace my OEM with these these are much smoother than the OEM’s

      Fit 0/5
      Quality 0/5
      Bang For Your Buck 0/5

      Dec 19, 2023

      5
      2011 - mbenda95
      Installation Time: Afternoon

      Good Warranty!

      Purchased and installed these as a replacement to OEM which were shot. Arrived fast, easy to install. 4 Months later I noticed a tear in one of the axle boots. I contacted Extreme Terrain and they replaced both! Sometimes parts fail, even when they're brand and shouldn't. What matters is they did the right thing and replaced them.

      Fit 5/5
      Quality 4/5
      Bang For Your Buck 5/5

      Oct 12, 2023

      5
      2007 Base - Balljoint
      Installation Time: Afternoon

      CV Axel replacement

      Product was correct fit. I would strongly suggest replacing the seals when you do this job

      Fit 5/5
      Quality 5/5
      Bang For Your Buck 4/5

      Sep 16, 2023

      5
      2015 Base - Jgood1

      Axle shaft

      Fast delivery, perfect fit and a better deal than local parts store

      Fit 5/5
      Quality 5/5
      Bang For Your Buck 5/5

      Sep 6, 2023

      4
      2006 Base - JohnCol
      Installation Time: Afternoon

      Front CV axel shafts 2006 Tacoma

      Front CV axel shafts 2006 Tacoma. First off these are TRQ brand. They are well built and seem just as good as OEM. old boots were dry rotted and ripped. Install was not to bad. I did struts at the same time. Basically remove the sway bar end link, the tie rod end, CV axel bolt and the 2 bottom bolts from the lower control arm and you canslide the axel out

      Fit 5/5
      Quality 5/5
      Bang For Your Buck 4/5

      Questions & Answers

      No questions about this product yet. Ask the First Question

          Tacoma Wheel & Tire Gallery

          Tacoma Wheel & Tire Builds
          See Tacoma Wheel & Tire Gallery ( photos)