Installation Time
(approx) 2 Hours
Difficulty Level:
Light to Moderate mechanical skill required.
Installation Guides
No guide available for this part yet.
FREE 1 to 3-Day Delivery on Orders $119+ Details
Add Details
Verify parts fit & get product recommendations
M-F 8:30A-11P, Sat-Sun 8:30A-9P
$945.59 pair
Saved - View your saved items
We're sorry. We couldn't save this product at this time.
or use
Hey, guys. So today, we're checking out the Adjustable Front Upper Control Arms, fitting all 2016 and newer Toyota Tacomas. So if you're looking to add a lift kit to your truck, or if you've already done so, you're switching up a lot of the geometry when it comes to your suspension. Now, when you change up the geometry, it can cause some extra wear and tear on some stock components, and one of the main components that receives a lot of that extra wear and tear is your front upper control arms. Now, this option is gonna do a really good job at accommodating for that extra lift, considering that these are adjustable. Now, with this set, you'll get some better handling for street driving, and you're also going to get some better articulation if you do take your truck off-road. Now, with this set, you're also getting four degrees of caster adjustment and two degrees of camber adjustment, so you'll be able to adjust and set up your truck however you want.Now, these are also going to be very durable, made of a forged construction, and they're gonna have a heavy-duty ball joint, so you can ensure that they are going to hold up for a very long time, and it's also gonna come with everything that you need in the kit in order to install it. Now, with that being said, these are gonna come in at roughly $650 for both front upper control arms. Now, my personal opinion, I think for the quality and the fitment, as well as the functionality of these control arms, that is set at a very good price point. Now, in comparison to some other choices on the page, a lot of those other options are going to have fixed ball joints that are going to be set into place, and you're not gonna be able to really adjust the camber or the caster, because they are fixed. Now, they may accommodate for a larger lift, however, they may not adjust for that camber and caster again.And then there are going to be those choices on the page that are usually going to have more or less a stock construction. Now, with this, you are getting that durable construction. You're getting a heavy-duty ball joint, and you're also getting that adjustability, which is key to having the perfect alignment and the perfect setup for your suspension. So if you are looking for that, then these are going to be a great choice.As far as install is concerned, I'm gonna give it a two out of three wrenches on the difficulty meter. You are gonna need some pretty basic hand tools, but it is going to take you about two hours to get the job done on both sides. So speaking of that, let's jump into the install now.The tools that I used for my install were an electric and pneumatic impact wrench, an adjustable wrench, a hammer, a large pry bar, a breaker bar, a trim removal tool, a 19-millimeter open-ended wrench, a pair of vice grips, a pair of needle-nose pliers, a 1/4-inch drive ratchet, a 22, 19, 17, 12, and 10-millimeter socket.So, our first step to this is to take off our inner wheel well covers. I'm gonna use a trim removal tool to pop these clips out of place. Do the same thing for the other side. So, our next step is to disconnect our brake line bracket from our spindle here. I'm gonna use a 12-millimeter socket. I'm just gonna unhook that from the spindle. Gonna bend that out of the way. Now, we also have a brake line bracket up at the top here. I'm gonna use a 10-millimeter socket to remove that bracket. Once that's removed, we can unhook that from our control arm, and now we can remove our sway bar end link from our spindle. Now we can use a 7-millimeter socket to remove the nut off of our sway bar end link. So, what I like to do is put a little bit of pressure on the sway bar end link in order to remove it with an impact wrench. If you wanna do this by hand, you can grab a 17-millimeter socket and a 6-millimeter Allen socket or Allen key, and remove the nut by hand. This tends to be a little bit quicker. So, what we can do now is start to remove the spindle from our control arm, so what I'm gonna do is take a pair of needle-nose pliers and get this cotter pin out of the way. So, what I'm gonna do now is take a 19-millimeter socket and a breaker bar, and we're gonna loosen that up. Now, we're not gonna remove this all the way, but we are going to loosen it up a decent bit, because we need to knock the tapered ball joint out of the spindle here.What I'm gonna do next is grab a ball peen hammer. You can use any hammer. And we're gonna tap on our spindle from a couple of different directions, and it's gonna pop that tapered ball joint out of place. There it goes. So, once that's out of place, what we can do is actually support the bottom of our control arm with our pole jack, and then we can take off that castle nut. I'm gonna continue to use that 19-millimeter socket. So, to make sure the spindle stays in place, as you can see, it's got a lot of movement, I just took a caliper hanging tool, and I'm just gonna hook that onto one of our springs. This is just gonna make sure that it's staying in place, not hurting any of our brake lines, and we're not bothered by it while we remove our control arm. So, in order to get our bolt to clear, what we're gonna have to do is bend back a little bit of this pinch weld area, this body seam right here. That's going to allow the bolt to pass through. We're also gonna have to remove the clip that's holding in our body harness right here. So what I'm gonna do is take a pair of vice grips, clamp onto this body, and we can just bend it back ever so slightly.Now, this isn't going to hurt the integrity of the truck. This is just really to get it out of the way. So, the washer doesn't have to clear. It's just the bolt head. So, that should clear there. Now we are going to take a pair of needle-nose pliers and just pinch that clip here. So, we're kind of just getting some stuff out of the way so we can prep to remove this bolt. So, at this point, what we can do is start to remove the bolt. So I'm gonna grab my pry bar, a 19-millimeter wrench, and a 19-millimeter socket. And what I'm gonna do is actually put the pry bar and the socket on this side. We can put the wrench on this side, and we can start to crank on it. So, once that's loosened up, we can continue to loosen it up by hand. We're gonna have to continue, if it's not coming off completely. So, once that's off, we're gonna save that nut and washer, and we're gonna start to push our bolt through.Feels like it's starting to hit. If it is, we can take that pair of vice grips, again, just bend it out of the way best we can. Now, there is a wiring harness here. It's giving you a little bit of trouble, you can always disconnect that clip. At the second clip as well, we're gonna take the same needle-nose pliers. Just pinch the clip on both sides, pull back. What you can also do if you're not getting enough room back there is take a large pry bar, and we can pry on it this way as well. Right. So, once that bolt is most of the way out, what we can do is kind of reposition the control arm to get the bolt all the way out, which you'll see that this is a very long through bolt. So, that's what we have to get out. And once that is out of the way, we can completely take out our control arm.So, before we jump into the rest of the install, I do wanna stop down and tell you guys a little bit more about these new control arms and what you're getting with these in comparison to your factory option, and some of the similarities and the differences between the two. Now, starting off, this is going to be a big upgrade, considering this is going to be adjustable over the factory fixed arm. Now, your factory arm is good for stock applications, but if you're looking to upgrade your suspension, add a lift of your Tacoma, or even a leveling kit, then a control arm that is adjustable is probably better in the long run, for a number of different reasons.Now, when you upgrade to a different suspension, it is going to throw the geometry off, and that can cause some wonky ankles between the ball joint and the spindle. Now, for a longer period of time, it will start to deteriorate the ball joint itself. As you can see, our ball joint is actually starting to get rid of that seal there, it's starting to leak, as to where that won't happen with this new option. So with the stock arms, you are going to have a great application for your stock suspension, but once you add a suspension, you are throwing off some of those angles, which can affect your control arm, your stability, and your handling. Now, that ball joint up on the control arm, that is going to be heavily affected by those angles, and if it's not adjusted or accounted for, it can start to break down and wear out that ball joint over time. As you can see, our control arm has a bit of wear and tear, and even on our ball joint here, you can tell that it's leaking a little bit because of the thrown off angles.Now, with this option, you're not gonna get any of that, because this is fully adjustable. Now, you can adjust this for up to 4 degrees of caster and 2 degrees of camber, so if you do add a lift, you will be able to adjust for that for your alignment, and your alignment technician will be able to do that, and there is also a guide on how much caster or camber you technically will need in the install instructions. Nonetheless, this is going to be a very durable setup. You are getting a factory-style bushing, but this is going to have a forged steel construction. You're also getting an X-axis sealed flex ball joint here. So this will be very durable, able to hold up in the long run, especially if it is going to be adjusted correctly. Then you're also getting a Zerk fitting up at the top, for greasing and easy maintenance.Now, as you can see, this is going to be bolt-on construction, which is completely different from the pressed-in option that we have from the factory. But, again, that is going to be able to allow the adjustment, so once that's in there, it's going to sit in the top and the bottom channel. There's gonna be two separate channels, as you can see here, the square one down at the bottom for the square washer, and then the circular washer up at the top, that is going to allow that adjustment there. So, what do you say we go ahead and install everything and get it on our Tacoma?So, what we can do is take the square washer and the circular washer and the nut off of the ball joint. Then what we're gonna do is install our ball joint. So, we're gonna grab our square washer. Now, that is going to offer adjustment there in itself, but then it's going to lock into that channel, and you'll be able to adjust it outward and forward. Then we're gonna flip it over onto itself. This is where we put our circular washer. Again, you can see, in that channel, without the actual ball joint in the way, what it's capable of doing, and we can take our nut and adjust that, and tighten that down. Now, this is gonna depend on where you need it, and it's also gonna depend on your alignment and your alignment technician, when it comes time to align your truck. I'm going to try to keep it as even as possible, so we might have to move it a little bit forward, because we are working with the factory suspension, but once we get that in place, we'll be able to adjust it on the car as well. So, I'm going to grab an adjustable wrench, and we can tighten that up for right now. So we can just tighten it up. And if we need to adjust it, we can on the car. Now we can head over to our truck and install our new control arm.So, what we can do is put our bolt into place and our control arm into place. May be easy to get your bolt started. Again, this is gonna take a little bit of finessing. So once that's in place, we can take our factory washer and our factory nut, and put that on. And I would recommend that you completely torque this down while it's on the ground. However, we are going to tighten it up right now, that 19-millimeter wrench and socket. And we'll just wanna get it pretty snug so it's not moving around a whole lot, but we will torque it to spec, or I would recommend that you torque it to spec once it's back on the ground. Once that is in place, what we can do is get this back into the spindle. So, we're gonna lift this up. We're gonna unhook our spindle. So, once that's in place, we can take our new castle nut and install it.So, I would like to mention that you will be using the offset washers in the kit. Now, this is one from our other control arm. As you can see, it has a bulge. You wanna make sure that it's sitting with the offset position facing the strut, and the same thing on the other side. That little bulge is gonna be facing the inside of the control arm, and you can discard the OEM washers, but that's what I have on here. You just wanna make sure that that is in place before you go ahead and tighten that down. Next, we can get our castle nut on here, as well as our cotter pin. Then we can install our castle nut. I'm going to install it as hand tight as I can, even if we wanna raise up our pole jack a little bit. Then what we can do is tighten that up with a 22-millimeter socket. It is gonna be a little bit different than the factory one. Then we can take our new cotter pin, pair of needle-nose pars, separate them. Really doesn't matter what you do with these, you just want to make sure that it's not going to come out once it is...So, what we can do now is reconnect our sway bar end link with that 17-millimeter socket and 17-millimeter nut. After that's on there, all we have to do is reconnect our brake line brackets, and put our trim pieces back on. So, this control arm's gonna come with a threaded hole for your brake line, so what I'm gonna do is take our factory bolt, thread that into the top of our control arm, and tighten it up with a 10-millimeter socket. Then we can reinstall this bracket on our spindle, tighten that up with a 12-millimeter socket, then we can reinstall our trim panels. Same with the front. And there's gonna be a little arrow telling you where to click them in. So, after those are installed, what your next steps are going to include is doing the same thing on the other side, then you can grease the ball joint with a grease gun, and then you can take your Tacoma to go get an alignment, and then you'll be all set to go.So that's gonna wrap it up for my review and install. Make sure you like and subscribe, and for more videos and products just like this, always keep it right here at extremeterrain.com.
View Full TranscriptNow Playing
2016-2020 Tacoma Adjustable Front Upper Control Arms Review & Install
18:19
Subscribe: New Tacoma videos daily!
Subscribe to our YouTube Channel
Features, Description, Reviews, Q&A, Specs & Installation
Brand | SPC |
Control Arms Placement | Front Upper |
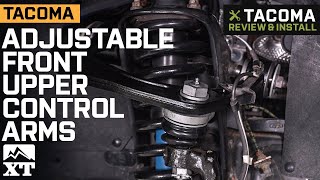
Reinforced Steering and Handling. Ensure your Toyota Tacoma’s directional stability by using these Adjustable Front Upper Control Arms. This front pair of fully adjustable control arms provide significant improvements in the overall steering and handling of your truck. It also facilitates successful navigation on challenging trails with the enhanced steering capabilities. Additionally, each assembly features a premium greaseable ball joint that offers 80-degree articulation for an enhanced range of movement.
Premium Tubing and Bushings. These Adjustable Front Upper Control Arms were crafted using heavy-duty materials. The fully forged arms exhibit high structural rigidity and corrosion resistance. Each arm is covered in a black powder-coated finish to resist rust formation, abrasion, and chipping. It is also furnished with isolated xAxis™ sealed flex joint bushings and bonded rubber sleeves to eliminate binding and minimize noise, vibration, and harshness.
Simple Installation. Designed for straightforward installation with no modifications needed, these Upper Control Arms directly fit into your truck’s factory mounting points. The installation process requires light to moderate mechanical skills to complete.
Application. The Adjustable Front Upper Control Arms are intended for use on all 2016-2023 Toyota Tacoma models.
Fitment:
SPC 25470
CA Residents: WARNING: Cancer and Reproductive Harm - www.P65Warnings.ca.gov
Installation Info
Installation Time
(approx) 2 Hours
Difficulty Level:
Light to Moderate mechanical skill required.
Installation Guides
No guide available for this part yet.
What's in the Box
Review Summary
Installation Time: Afternoon
Feb 16, 2024
SPC UC Arms - 33" Tires , No Cab Mount Chop
I installed a 33" tires (285/70/17) Goodyear DuraTrac All Terrain. 2.5" Lift and NO Cab Mount Chop. SPC adjustable upper control arms work with the lower (adjustable) controls arms to place your tire centered in the wheel well and not too far out. Result - plenty of clearance. Save the $500 cab mpount chop and install these. Get alignment from someone who has done these arms.
Jun 12, 2023
Exactly what I needed
Installed some 285/70/R17s and there was rubbing in the rear fender. Bought these UCAs and it fixed the rubbing in the rear part. Just needed a viper cut to solve the front!
Apr 12, 2021
These upper control arms are a must have
I swapped out my aftermarket upper control arms for these! They are a must have for running larger tires with an offset! Great adjustability. Not cheap but worth every penny. I wish I purchased these first. DO NOT CHEAP OUT! Highly recommend these!
Mar 22, 2023
Spc upper control arm
Bushing on my spc control arm is making noise and and its seems like loose and the ball joint is leaking the grease all over the rubber
Jun 12, 2024
Review shared from SPC Adjustable Front Upper Control Arms (07-18 Tundra)
Uppers
Great item installed pretty quickly and it is exactly what I needed.
Aug 28, 2021
Review shared from Camber Bolt Kit (05-15 Tacoma)
New ones every time I get an alignment
There an expensive and I use new ones every time for a new alignment it’s an easy way to make sure they’re actually doing it
Mar 2, 2021
Review shared from Camber Bolt Kit (05-15 Tacoma)
Finally found what I’ve been Looking for!!
After replacing my UCAs & installing 7.5” of suspension lift my front end alignments would always be a fraction off center. I searched the internet countless hours & asked everyone I knew with full suspension lifts but still had no luck or leads on how to fix the issue which is causing one of my front tires to wear & feather quickly. Then finally I found these adjustable camber bolts, which were the answer to my camber problems! It took my mechanic around 2.5 hours to install. After installation it took an estimated 5 minutes to adjust the bolts to resolve and correct my camber problem.
Jun 12, 2024
Review shared from SPC Adjustable Front Upper Control Arms (07-18 Tundra)
Uppers
Great item installed pretty quickly and it is exactly what I needed.
Feb 16, 2024
SPC UC Arms - 33" Tires , No Cab Mount Chop
I installed a 33" tires (285/70/17) Goodyear DuraTrac All Terrain. 2.5" Lift and NO Cab Mount Chop. SPC adjustable upper control arms work with the lower (adjustable) controls arms to place your tire centered in the wheel well and not too far out. Result - plenty of clearance. Save the $500 cab mpount chop and install these. Get alignment from someone who has done these arms.
Jun 12, 2023
Exactly what I needed
Installed some 285/70/R17s and there was rubbing in the rear fender. Bought these UCAs and it fixed the rubbing in the rear part. Just needed a viper cut to solve the front!
Apr 12, 2021
These upper control arms are a must have
I swapped out my aftermarket upper control arms for these! They are a must have for running larger tires with an offset! Great adjustability. Not cheap but worth every penny. I wish I purchased these first. DO NOT CHEAP OUT! Highly recommend these!
Mar 22, 2023
Spc upper control arm
Bushing on my spc control arm is making noise and and its seems like loose and the ball joint is leaking the grease all over the rubber