2024-2025
 2016-2023
 2005-2015


Installation Time
(approx) 3 Hours
Difficulty Level:
Light to Moderate mechanical skill required.
Installation Guides
No guide available for this part yet.
 FREE 1 to 3-Day Delivery on Orders $119+ Details

Add Details


Verify parts fit & get product recommendations
M-F 8:30A-11P, Sat-Sun 8:30A-9P
 500+ Reviews
9 Answers
500+ Reviews
9 Answers
$249.95 kit
Will this fit your Vehicle?
Saved - View your saved items
We're sorry. We couldn't save this product at this time.
or use
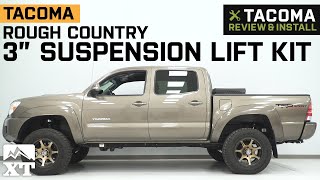
Hey, guys. It's Joe from ExtremeTerrain back with another lift kit video. Today we're gonna be working on the Rough Country 3-Inch Suspension Lift Kit, fitting all six lug '05 and newer Tacomas. Now this is gonna be a great lift for you if you're looking for a budget-friendly spacer lift kit that includes a few extras, all in all, you're gonna be able to run some larger tires, you're gonna get more clearance all the way around your truck and you're gonna get an awesome level off-road stance. So our lift here is gonna be generated by spacers in the front and spacers in the rear. Our front spacer is gonna be 3 inches in height and our rear spacer is gonna be 2 inches in height, we have these nice fabricated lift blocks here. Now the first thing you're probably asking is what is the deal? What's the difference between 3 inches in the front, 2 inches in the rear? Well, the idea here is to level out what's called rake, and not just the Tacomas but all trucks in general for that matter, they sit a little bit lower in the front, little bit higher in the rear. Now that's the counteract if you have any weight in the bed or if you're towing something heavy, the truck would then level out, but if you're not doing any of those things too often it's more of a looks thing, so bringing up the front just a little bit higher is gonna make your truck nice and level and give you that nice off-road stance. Now on top of fixing the rake, you're gonna get all of the other benefits a lift kit brings as well, just a little bit of clearance out of this one. Again, this isn't gonna be your full 7-inch suspension lift kit but the clearance is there, definitely something to think about. If you plan on going with a heavy-duty front bumper in the near future that's made out of steel, those things are heavy, that added weight on the front of your truck will also add some sag. Something like this is absolutely gonna help you fix that and help bring the truck level just like I said earlier. But one of the nicest things here in terms of looks, something like this is gonna allow you to run some larger wheels and tires as well. So on our truck, as you can see, we do have some aftermarket wheels on there, but the tires are exactly the same as factory two 265/65R-17, that's about 30.6 inches. That's factory, that's what you're looking at right now. Once this kit is installed though, it's going to allow us to go all the way up to a 33-inch tire. Now one thing I did want to say about the 33s is in our studio on flat ground, they do clear pretty well but if you're off-roading on the trail, you might get a little bit of rub, if you wanted to avoid that altogether, I would recommend going with the 32-inch tire. So, all in all, this is a pretty nice kit from Rough Country but what I really think differentiates this from the rest are the extras that come in this kit. We're gonna start with the shocks here nearest to me. These are Rough Country's N3 shocks, nice nitrogen charge shock, gonna stand up way better to the abuse than the hydraulic shocks on our truck from the factory. We're gonna get these side by side with the factory shock in just a second here and point out some of the key differences, but what you need to know is that nitrogen charge is going to take the abuse way better than a hydraulic shock would. Now another nice extra from Rough Country is our differential drop right up here. This is going to maintain the geometry of our front suspension, help level out those CV axles, keep them nice and straight, preserve the life of them. So again, a nice touch from Rough Country with the differential drop. Now pricing for this kit is gonna be the kicker. Again, you can't expect $5,000 full-on lift out of this kit, but if you're on a budget, you really can't beat what you're paying for this guy, it's gonna drop in right around that $300 mark and that money really does go far for what you're getting out of this spacer lift here. It even comes with a limited lifetime warranty from Rough Country. Now the install for this is not gonna be too bad, and I say that in terms of a lift kit. I'm gonna give it a harder two out of three wrenches on our difficulty meter. I think it would take you three to four hours at most if you come with the right tools. There is a little bit of cutting that we need to do to make room for our differential drop but it's not that bad, definitely worth it. I'm gonna show you exactly how to do it in just a second here. So without any further ado, let me show you what tools you'll need and how it's done. Tools required for this install, and there are a lot of them. We're gonna start over here with the cutoff wheel, die grinder, an impact or two, U-joint, 6-millimeter Allen key, basic socket set ranging from 10 millimeters all the way up to 22 millimeters, zip tie, sharpie, vise grip, ratchets, we used the air ratchet, quarter-inch and three-eighths ratchet, a basic socket set ranging from 14 millimeters all the way up to 19 millimeters, ratcheting wrenches will help you a ton with this install, a pry bar, mechanics gloves, safety goggles are a must for an install like this, needle-nose pliers, Channellock, tape measure, some Loctite, painters tape, hammer, dead blow, spray paint, and a lubricant or rust penetrant like PB B'laster. So before we jump into the install here, couple things I did want to note, safety glasses are a must, make sure you have a pair at least on hand. You want to be really careful when you're doing this, there could be a lot of rust underneath of your truck, you don't want to get any stuff or metal in your eyes. So safety glasses are a good idea. Gloves also, these have saved me from bunches of scrapes and nicks, I recommend them, especially when doing lift kits like this one and then obviously you want to get your wheel off, get this truck jacked up safely in the air so we could work on it. Now with all that done, we can move on to the harder stuff here. We're gonna grab our impact as well as a 12 and 10-millimeter socket and as well as some needle-nose pliers. We're gonna get some of our brake line and ABS line brackets disconnected. So first we're gonna take the 12-millimeter socket and get this bracket off of our knuckle. Just gonna loosen that up, it's gonna pull that at way here. And then just for safekeeping, I'm gonna thread that right back in and that one is good, we're gonna move to this one back here and do the same exact thing. So next we're gonna turn our attention to this bracket up top, this one is a little different. The first thing we're gonna do is grab the needle-nose pliers and we're just gonna peel this tab back so we can pull that ABS line off of the bracket. Then we're gonna take a 10-millimeter socket and unbolt it. And the reason I pull that line out is because even with this disconnected, you still don't get enough slack on that, so we're moving it from it's tab, is a good idea and we're always gonna put that back and fold that back in later. So next we're gonna turn our attention to the tie rod here, this is held on with a 19-millimeter nut. First thing's first though, we got to get that cotter pin out of the way, so we're just gonna bring in the needle-nose pliers one more time. Now our cotter pin was rusted in there pretty good, so I had to up the ante a little bit, I also hit it with some PB B'laster, just a little bit of rust penetrant and I'm just gonna take a small pair of vise grips and pull, and we're free. So now we're gonna take our 19-millimeter socket and put that down over that castle nut there and get that off. Now what I'm gonna do here is I'm gonna thread that back on, reason being is this ball joint is caught in the collar there, so I'm just gonna thread the nut on to protect our threads on that ball joint. And what we're gonna do in order to release our tie rod is hit this collar with a hammer and the shock should break that free. And there we go, you can see our tie rod is free, so what we're gonna do is remove that castle nut and we can pull that out from the collar. Now we're gonna turn our attention to the sway bar end link here, I'm just gonna crack that loose with a 17-millimeter wrench and then spin that nut off and that should come right out. If you do however need to hold that ball joint still, you can take a 6-millimeter Allen key and put it through the end of the stud here and that will keep that ball joint from spinning. That 6-millimeter Allen key hole is right here. So next up we do have a big one here, this is the ball joint on the upper control arm, 19-millimeter nut on there. Again, we're gonna pull out that cotter pin first. This one is a little bit different, you kind of want to get it started from the side there. See how it has that little hook on it, once you pull that out should slide right out and then we can take our 19-millimeter socket on a U-joint and loosen that up. Now just like the tie rod, I'm gonna thread that castle nut back on. Not only is this to protect our threads because this ball joint is stuck, we're gonna have to hit this collar here with a hammer but I'm just gonna give that a couple extra turns because what this is gonna do is when this breaks loose, this ball joint breaks loose, it's gonna catch our control arm from flinging up and into our spring here. So, ready to go, just gonna grab the hammer and give that a couple hits. That one breaks loose real easy, now I can just pull down on it. And I'm just gonna pull that nut off and let it drop and then we can separate the two. So now before we start removing our strut assembly, you want to jump over to the other side and get that caught up, we've already done that off-camera. Now the reason you want to do that is because this strut assembly is gonna be stuck in here behind the sway bar until you could do exactly this and pull that all the way down. And in order to do that, obviously you need to remove the sway bar end link itself but this knuckle also needs to be swung that way in order for everything to clear. So get the other side caught up and you can catch right back up with us right at the next step.And that next step is gonna be the three 14-millimeter nuts on the top of our stride assembly here, I'm gonna use the ratcheting wrench to crack those loosen then I'm gonna finish them off with the air ratchet. So that one in the back is a little bit tough to get to but with that out of the way, we can go ahead as planned, just gonna break these loose. Which they're actually pretty tight, probably tighter than they should be. And then I'm gonna finish them up with the 14-millimeter socket on the ratchet.So now we're gonna move to the lower and this bolt in here is a 19-millimeter head and the nut is 19 as well, so we're just gonna work our wrench on that, work in our socket on that and crack that loose. So now everything is loose, and I said we were gonna swing this down past the boot but we still need a little bit more if we do it that way. So what we're gonna do, swing this guy all the way up and that should be more than enough to just pull that out of the lower control arm and off the truck. So now we come to what frankly is probably the easiest part of our install here, actually installing the spacer itself onto our strut assembly, this is gonna be real, real easy. First thing we're gonna do, take some blue Threadlocker, we're just gonna hit the threads on the top of our hat here just to make sure our nuts don't slide off for any reason, this is a good measure to take. And accounting for the space on that spacer, I'm just gonna hit around the middle. Now we can just take our spacer and put that down over the studs. And if that doesn't fit right out of the gate, give it a spin, it'll line up eventually. Then we're gonna take the 14-millimeter nuts we removed from those studs earlier and install our spacer. And the nice thing about these is they have that nice shoulder on them so they stay at the end of the socket and makes it really easy to get these started and really easy to make sure you don't cross-thread them at all. Now the downside to this spacer here is the holes to get to those 14-millimeter nuts are really, really small, so we're gonna be using the thin wall socket here. And whenever you use these chrome, guys, always wear safety glasses if you have it on the end of the impact gun. In this case, we do need to use it so safety glasses on, 14-millimeter socket on and we're just gonna tighten those down evenly. So the strut assembly is good, you just want to do the same thing for the other side. And then we're gonna put these aside because the next thing we're gonna work on is our differential drop. So here we are underneath of our differential and you can see there are a couple of skid plates in the way here, we're gonna get these out of the way, they are held on with four 12-millimeter bolts, one here, one here and two in the back, we're gonna remove all of those and pull this off. This thing is pretty loud, so if you're using the impact gun like I am just be ready because this thing vibrates and is really loud. So we pulled away the first skid plate and then this second one here is held up with these two hooks, I'm just gonna push that up and remove that one as well. So our next step here is we're gonna remove these two skid plate reinforcements right here and right here, they're held on with seven 17-millimeter bolts, so easy enough to remove those. But before we do, I just wanted to make a quick note of this lip on the driver's side edge of this skid plate reinforcement, this is what's going to impact our diff drop. So what we're gonna be doing here is we're gonna cut away in this area so that when this arm right here drops down, it won't impact this lip. This is why we're gonna have to cut this away in just a second but first we're gonna remove them.So now what we're gonna do is unbolt our differential. Right here this big long bolt all the way through this crossmember is gonna be a 22-millimeter for the bolt head and a 19-millimeter for the nut. We're gonna break that loose on both sides but before you do make sure you have a pole jack to support your diff. So now we're just gonna lower our pole jack a little bit just enough to get our diff drop spacers through, that should be good. We're gonna grab our new hardware and get those installed. We have plenty of space right there, [inaudible 00:17:30] a little bit tighter. Now one thing to note is you do want to transfer over this big washer to the new hardware, this a little bit longer to accommodate for that extra space and then you can get a nut started on top. So now we're gonna tighten down our new hardware, the nut is gonna stay the same, 19 millimeters but the bolt head is gonna change from a 22-millimeter to a 19-millimeter. So that's our differential drop but before we install our skid plate, we do need to do some cutting on only the driver side skid plate reinforcement. You will not need to do this for the passenger side, so you got that going for you which is nice. But what we're gonna do here is basically just cut away this lip. Rough Country recommends you go an inch up which I've measured from the lowest point right there and four inches deep, that should give you more than enough clearance around our lower differential but really all you have to do is cut away this bend lip here. Now I put some painter's tape on there just so you could see my marks really easily and so frankly I could see my marks pretty easily. You don't need to do that, if you had a paint marker, this would work just fine obviously, but since this is such a weird shape, we're gonna put this in vise, use the cutoff wheel to take that spot away and then we could re-install this back onto our truck after a little bit of spray paint to make sure that doesn't rust. Coming right along here, little bit more to go on this 4-inch line right here and then we can take care of that 1-inch line which is a little bit tougher because of that bend. So that is pretty much right up to the corner here. Now we're gonna come this way. So now with our new cutaway on the driver side, we can go ahead and reinstall our skid plate reinforcements. And right here you could see this edge would have impacted that lip and basically that's why we needed to cut that away. But I'm gonna get the other side tightened up by hand and then we're gonna run this in with a 17-millimeter socket. So now we have to reinstall our skid plates, this black one goes on first and it's going to sit in those two hooks right there, then we're gonna get these two 12-millimeter bolts that we uninstalled from earlier and we're just going to install those finger tight for now. Now we can grab this TRD-style skid plate, and if you don't have these, you just tighten up the two 12s right here and the two at the back, you'd be good to go. But this is slotted at the back, so we're just gonna get that started and the bolts are already in there, and we're just gonna run those all the way through. So with our differential dropped, we're now ready to put our strut assembly back in place, we're just gonna line up the studs on the spacer with the holes in the bucket and drop this right in. Now we can take one of the 15-millimeter nuts included in the kit and I'm just gonna spin that on hand tight for now while we get the bottom in to the lower control arm and the sway bar down past the spring. So now we're just gonna pry down on the lower control arm and try to get our bolt through the bottom. And then on the other side, we can reinstall our washer and nut and we can tighten down the lower portion of our strut assembly with a 19-millimeter wrench and socket. So now that we have our strut assembly actually in and lined up, we're just gonna jump right back up to the top and tighten down our three 15-millimeter nyloc nuts. So our strut assembly is in, there's one more hard part for us to do and it is this upper ball joint back into our knuckle. Now this isn't too bad, what we did here is we put as much pressure as we possibly could on the lower control arm to get that to come up as much as we can, then we're just gonna come in here with pry bars and we're gonna walk down our coils. Now once you have the ball joint through, you can just re-install that 19-millimeter castle nut and release on the pry bar. Now we're gonna come in with our 19-millimeter socket on a U-joint just like before. We're gonna tighten that down and as we do, we're just gonna keep this cotter pin hole in mind and try to line up one of the slots. And once we have that tightened and lined up, gonna push back through that cotter pin like so. So now we just have to button some stuff up, we're gonna start with our sway bar end link that's gonna go through the knuckle and we can reinstall our 17-millimeter nut. And again you could use a 6-millimeter Allen key if this ball joint spins on you but in our case, these threads are actually pretty nice. So we're just gonna tighten that down with our ratcheting wrench.Now we can do our tie rod which is just gonna line up with the collar. Come straight up through and we're gonna tighten that back down with our 19-millimeter castle nut. And once we have that secured, don't forget our cotter pin. And then all that's left for us to do, is tidy up some of our brake and ABS line brackets, I'm gonna remove the bolts that I installed earlier, line up the hole on our bracket and get that started. Then we can come in with a 12-millimeter socket and tighten that down. Same thing goes for this guy back here. Just pull that aside, loosen up the bolt. Line that up and re-install. For our last bracket here, again, we're just gonna remove that 10-millimeter bolt, feed it through the bracket, thread it back into the upper control arm and tighten that down. And for our last step here, obviously we can't forget our ABS line, so we're just gonna put that in like so, needle-nose pliers on that tab, we're just gonna crimp it back over. Now the install is going to be the same exact thing on the other side. So we have the front completely wrapped up, we just need to take care of the rear, which is going to be a lot easier in comparison. We need to get our shock outta here not only because we're gonna be replacing it but we need to remove it so our suspension can drop far enough so we can get the space or in, this is gonna be really easy, 14-millimeter wrench, we're just gonna remove the nut on top of the shock. So as I'm wrenching on this nut, you can see the whole body of the shock itself is spinning. And what we're gonna do here is actually a little bit different than you might expect. If you wanted to grab this little top of the stud with like a vise grip or a small wrench, you could absolutely do that. But what I find is the easiest way is if you just take this boot, you could pull it straight down and that's gonna reveal the shaft itself. And what we're gonna do then is just grab on to that as tight as we can with a pair of vise grips. Now this is okay to do. If you grab that tight enough, this won't spin and you won't scratch any marks into it but not only that you usually hit your bump stops before these travel all the way up to here, so that's fine. Now that we have a grip on that, I'm just gonna spin this over to the frame. So grabbing onto the shaft is a fine way to do it. If yours works like that, great but this nut is extra tight for us. Before we bring out the heat here, we're gonna try up top and see if we can get a better grip, like that. Now another thing about doing it like this is eventually the nut is gonna push off our vise grips but hopefully, at that point, this is loose enough that we can grab onto the shaft. Like that. Exactly as expected, come in here like this and finish it off.So just to prepare for our axle dropping and our leaf springs dropping with them, we're also going to have to remove this e-brake cable bracket, it's held on with a 12-millimeter bolt, we're just gonna zip that right out. So now we're gonna loosen up the bottom of our shock, this is a 17-millimeter bolt head and 17-millimeter nut. Now the bolt on our truck is pretty well seized in there, so I hit it with some PB B'laster just to free up some of the gunk in there. I'm also gonna do a little bit more convincing with the hammer here on the end of the stud. So after a lot of convincing, this is finally using the thread to work its way out. It shouldn't be this tight on the other side. I just took the bolt and pulled it right out. I'm not sure what's going on with this one. But if you have to do this, lots of PB B'laster, white silicone grease, that sort of thing. Try to get this out before you break out the heat. It would be a shame to ruin the bushing on this Bilstein. So looks okay, just pretty gunked up, that's all. Now with that out of the way, you can go ahead and grab your shock, remove it from the mount. Now with that bolt removed, you could go ahead and grab your shock and work it free of the mount. Now at this point again, you want to make sure your axle tube is nice and supported then we can come in here with a 19-millimeter socket and remove the four nuts on our U-bolts. And if you couldn't tell from the first one, good idea to wear safety glasses for these. Then we can remove that plate on the bottom as well as our two U-bolts. So our Tacoma is completely taken apart in the rear here. Before we start putting stuff on, I figured now will be the perfect time to stop down, put our shocks next to each other and just compare the differences between these two because we're about to be installing our new Rough Country shock here in just a second. Now it's on the table side by side next to our Toyota Bilstein shock. This is part of the TRD package. It's a great shock, not a hydro shock, this is a nitrogen charged shock. So just like our Rough Country over here, that nitrogen charge is intended to hold up to the abuse. But other than the color of these two shocks and that blue boot on there that's really where the similarities between these two end. If I put these side by side like so you can really start to see some of the differences and improvements that our Rough Country is going to be making. So moving down here to the shock body, diameter is coming up from one and a half inches all the way up to two. Not only is that gonna help with durability but more volume in the shock, that fluid is to take longer to heat up. So this is going to be able to take the abuse a little bit longer than that Bilstein would. Moving down here to the shaft, if I move this boot down a little bit, you can see the diameter of our shaft is also about doubling here. So that's just gonna add to the rod durability of this new Rough Country shock. Now other than that, our last difference here is just gonna be in the overall length, this Rough Country is designed to be used with the spacer lift we're going to be installing so you get the full amount of travel inward and out. So without any further ado, we have to head back to our truck, do a little bit of prep work before we put this Rough Country shock in. So over here by our axle tube and pole jack, all we're gonna do is start to lower this down. Now one thing you do want to watch, these brake lines here. If you didn't get enough slack in these, the insert the lift block in between the actual tube and the leaf spring, great. If not, which it looks like we're about to do this, you can remove that bracket here with a 12-millimeter socket. And just to maintain, as we need brakes, I'm just gonna remove that. That should give us a little more room. Still loose enough. And once you have enough space you could just insert your lift block right like so. Now one thing to note before you do this, this has a very, very, very slight taper to it. This side is a little bit smaller than this side over here, you want to make sure the smaller side is pointed toward the front of the truck. And then once we have that lined up we're just gonna come up on pole jack and that is one lift block seated. So on our way up here, after we have enough slack on that brake line bracket, we're just gonna reinstall it with that same bolt. And after that's done, we can just come around here with our new longer U-bolts and we're just gonna re-install that plate on the bottom. Now once you have that plate on, the thread should hold it still long enough for you to come in here with the flat washers and 22-millimeter nuts included in the kit. Now obviously we're gonna come in here with the 22-millimeter socket and tighten these down, not so obviously though is just like tightening down the tire, you want to make sure the weight here is evenly distributed, so you want to tighten these down in an X pattern. So next up we're gonna install our new Rough Country N3 shock. And we're gonna do this a little bit differently here than you would expect. First thing's first though, we do have to install our metal washer and rubber bushing and we're just gonna feed that all the way up to the mount of top and get that started through. So now we're just gonna get that started in our upper mount with the bushing installed. Then we can compress our shock a little bit, shouldn't be that hard to do and we're just gonna push our bolt in and then we can secure that with the factory washer and 17-millimeter nut. So now that we have the bottom seated, we could come up to the top here and we are gonna use the Channellocks just to compress those bushings a little bit then you can thread on the 15-millimeter nut and start tightening it down. And this doesn't need to be too tight, just enough to compressors bushings and if you could see some threads coming out the top of that stud, you're pretty much good to go. So now that we have the top tightened down, we can tighten down the bottom of our shock absorber as well and lock this in place using a 17-millimeter wrench and a 17-millimeter socket. So finally the last step here, this is our e-brake cable bracket. Now simply put with the lift block installed, there is no slack left in this thing to get this bracket up there and tightened down with the original bolt. So we're gonna break out the old zip ties here and just keep this from rattling around. Now the install is going to be the same exact thing on the other side. Now, guys, that is gonna do it for the install. Just to wrap things up here, highly recommend after doing this to your Tacoma to drive it right to the alignment shop. But that's gonna do it for me, and it's also gonna do it for the Rough Country 3-Inch Suspension Lift Kit, fitting all '05 and newer six lug Tacomas. Thank you guys for watching. Subscribe for more videos like this one. Keep it right here at ExtremeTerrain for all things Tacoma.
View Full TranscriptNow Playing

Tacoma Rough Country 3 in. Suspension Lift Kit (2005-2019 6-Lug) Review & Install
41:59
Subscribe: New Tacoma videos daily!
Subscribe to our YouTube Channel
Features, Description, Reviews, Q&A, Specs & Installation
| Brand | Rough Country |
| Lift Height | 3.00 Inch |
| Lift Kit Type | Suspension Lift |
| Lift Kit Max Tire Size | 33 Inch |
| Lift Kit Includes Shocks | Shocks Included |
Confident Off-Road Stance. Give your Tacoma a commanding, off-road presence with customized comfort and optimum handling by upgrading to the Rough Country 3-Inch Suspension Lift Kit. With this system, you can install larger tire-and-wheel combos that will enable you to tread through various obstacles with ease, confidence, and a bolder sense of adventure
Enhanced Damping. The rear shocks offer reinforced damping capacity and controlled dynamics. Each shock features a large, robust build with a high-strength, 54-mm body, and a chrome-hardened piston rod. Additionally, 10-stage compression adjustability ensures customized ride comfort on various types of terrain.
Improved Stance and Off-Road Control. Rough Country manufactured the lift blocks, spacers, and U-bolts using premium-quality materials that exhibit high tensile strength and superior corrosion resistance. The rear lift blocks are designed for a level stance, while maintaining factory ride quality. The heavy-duty U-bolts ensure maximum support and eliminate any flexing of the leaf springs.
Professional Installation. This 3-Inch Suspension Lift Kit installs with mechanical expertise required. The components of this kit bolt to the factory mounting locations of your vehicle. This system also comes with all the hardware to complete the installation process.
Limited Warranties. A limited lifetime warranty is provided by Rough Country for this lift kit against factory defects in workmanship and materials. The shock absorbers are backed by a 3-year limited warranty. Some exclusions apply; please check the terms and conditions for complete details.
Application. The Rough Country 3-Inch Suspension Lift Kit is intended for use on all 2005-2023 6-Lug Toyota Tacoma models.
Rough Country 74530
CA Residents:  WARNING: Cancer and Reproductive Harm - www.P65Warnings.ca.gov
Installation Info
Installation Time
(approx) 3 Hours
Difficulty Level:
Light to Moderate mechanical skill required.
Installation Guides
No guide available for this part yet.
What's in the Box
Review Summary


Installation Time: Afternoon
Installation Cost: $2.00
Dec 23, 2024
satisfied
waiting on my tires then ill post pics with all that is set
Dec 18, 2022
Easy install
Best bang for you dollar easy install and the truck looks better
Dec 11, 2022

Looks great!
Put on 17” w/ zero offset wheels and 265/70r17 tires. They rubbed pretty good. Tire shop was looking at 285/75R17 but I don’t think those would fit even with this lift. Bought this and put it on. Still rubs a little, need to trim the mud flap. Be careful or you’ll be doing inner cv boots.
Mar 2, 2022
Easy install
Good lift for a little more clearance and appearance, less than 4 hours to install by myself
Dec 18, 2021
Easy to install
Watch the YouTube video available for my lift and made it real simple to install. I rate it a 10 out of 10 would recommend.
Sep 24, 2021
Well worth it
Love the lift, looks great and rides perfect. Only issue was with clearance of the upper control arm during installation. Control arm hits spring at full droop, allows ball joint to get pinched. When wheels and tires on and sitting on ground, plenty of clearance. I would not hesitate to install again. Very do it yourself friendly if you have decent mechanical skills and tools.
Aug 17, 2021
Rough Country 3 inch lift
Great lift, rides pretty good. Thought it would be a lot more stiff going over bumps, but so far no problems.
Aug 15, 2021
Good lift kit
Fairly easy install looks amazing, works super easy with a spring compression tool but went very well
Aug 14, 2021
Excellent
The lift kit was very easy to install with very little cutting. It took about 2.5 hours
Mar 4, 2021
Amazing product!
I bought this for my 3rd gen Tacoma and love the look of it. It lifted my truck about 3 inches and was easy to install. Some cutting required but overall not a pain.
5 Top Rated Questions
Q: Is there need for the differential drop spacer on a RWD only Tacoma?
A: You would not need to drop your transfer case with this lift.
Q: With this lift kit, does it require an offset for the rims if I purchase 33” tires?
A: We do not recommend a specific offset for the wheels, however if you're off-roading on the trail, you might get a little bit of rub, if you wanted to avoid that altogether, I would recommend going with the 32-inch tire instead.
Q: Will stock shocks/struts in the front need to be changed?
A: No, the front shocks do not need to be changed when installing this kit.
Q: So no diff drop for a 4WD either? The video mentions a diff drop spacer - does the kit include it?
A: No separate differential drop is needed, the necessary differential spacer is included.
Q: Do I need to buy 2 of these or is this everything need for a full front and rear 3" lift?
A: This kit is the full kit for the 3 inch lift.