2018-2025
 2007-2018
 1997-2006
 1987-1995
 1976-1986


Installation Time
(approx) 2 Hours
Difficulty Level:
Simple installation for anyone.
Installation Guides
 FREE 1 to 3-Day Delivery on Orders $119+ Details

Add Details


Change Vehicle Color In Photo
Select Your Color
Verify parts fit & get product recommendations
M-F 8:30A-11P, Sat-Sun 8:30A-9P
 233 Reviews
5 Answers
233 Reviews
5 Answers
$354.99 each
Will this fit your Vehicle?
Saved - View your saved items
We're sorry. We couldn't save this product at this time.
or use
Add Local Installation
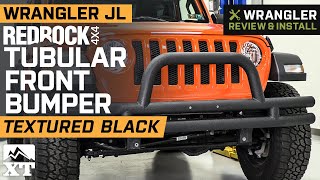
Hey, guys. So today I'm here with the RedRock 4x4 tubular front bumper in textured black, fitting all 2018 and newer JL Wranglers. So this is gonna be for the JL owner looking for a tubular front bumper to offer them some different benefits that their stock bumper was unable to allow, for some different functionality as well as an upgraded look, at a very affordable price point.So this is gonna offer you that full front end protection from tire to tire, giving you front tire protection, and you're also getting a tubular bull bar up top, that is going to provide you a little bit of grille protection. Now, this is going to be able to take a hit off-road, it is made of a heavy-duty 3-inch stainless steel tube construction, so this will stand up to whatever you throw at it.Now, this is also going to add a more classic and off-road look with the tubular design as well as the black powder coat or the textured powder coat finish on top, that's also gonna do a good job at protecting that steel and the materials underneath. Now, even though this is a more simplistic design and this doesn't have all of the bells and whistles that some of those aftermarket front bumpers do, you still are getting two light mounting tabs right in the middle there, and you can add off of this bumper, considering that you can add any accessory lighting of your choosing. Now, RedRock also does offer a very similar front bumper with a winch cutout in the middle. So if you did not want to have those light mounting tabs, if you were looking to get a winch cutout to add a little bit more utility in the future, that is also an option on our page.Now, speaking of that affordability, this is gonna be roughly 250 bucks. So like I mentioned, this is gonna be very simplistic where there aren't gonna be all those bells and whistles like some other aftermarket front bumpers may have, like that steel plating design, they may carry over the factory fog lights. They may have a winch cutout or a winch plate installed on the front bumper already, or they're just gonna have additional lighting which is going to jump that price point up. In my personal opinion, I think this is a very easy way to upgrade the functionality as well as the look on your Wrangler. So, install is gonna be a very easy one out of three wrenches on the difficulty meter, and this is gonna take no time to get installed with some basic hand tools. So speaking of that install, let's jump into that now.The tools that I used for my install were an impact wrench, a pair of safety glasses, an air ratchet, a 18-millimeter, 8-millimeter, and 7-millimeter deep socket, a 16-millimeter shallow socket, a 3-inch extension, a flathead screwdriver, a ratchet, a 19-millimeter open-ended wrench, and a trim removal tool.So the first step of our install is to remove our top trim piece, it's gonna be held in by a couple of pop clips, so you are gonna need a trim removal tool or a flathead screwdriver, and we can go ahead and pop those out. So you're gonna have two pop clips on the top of the frame rail here, we're gonna go ahead and remove those, then you're gonna have six pop clips along the back here. So this pop clip's giving me a little trouble, I'm just gonna grab my trim removal tool and remove that one. So if you have the Sahara model, you can take off that top trim piece. However, what I'm gonna do, because we have the Sport model in front of us, is go ahead and take off the 7-millimeter bolt that's also holding on that top trim piece. But I'm also gonna take off our side trim pieces here so we can access our inner bolts for our bumper a little bit better. So I'm gonna be using a 7-millimeter socket in order to remove the six bolts on the outer trim piece, and the 7th bolt on that top trim piece.So this bolt down here is gonna be the last one that we need to remove in order to take off our outer trim piece. However, there isn't a lot of space between here, so what we're gonna do is take off our bottom splash guard first. So I'm going to be using a trim removal tool to remove all of the pop clips that are holding in the front of our splash guard, and then we'll move back to the two bolts that are holding the rest of the splash guard in. So what we can do next is remove the two bolts on either side of the lower splash guard with an 8-millimeter socket. So, once that last bolt is removed you'll be able to pop out your lower splash guard. Then we can remove that last bolt with that 7-millimeter socket. Then after all of those bolts are removed, we can remove that trim piece, and that's going to expose the inner bolts on our frame rail. Then we can do the same thing for the other side. Looks like this one is stripped, that's okay, we can take that out. Once that's removed, we can go ahead and remove our whole trim piece.So, after we have most of our trim pieces off, we do have to remove this skid plate in order to access our bolts that are holding on our bumper. I'm gonna be using a 16-millimeter socket and an impact wrench to remove the two bolts holding on that skid plate. So, once those two bolts are removed, what we can do then is just lift up on the skid plate and fully remove it. So while we're up here, what I'm gonna do is just remove this top trim piece, and then that will give us access, as well, to those bolts that are holding on our bumper on those frame rails.So now we're ready to disconnect our bumper from our frame, but first we want to disconnect our main wiring harness, and put that aside so we're not damaging the wiring harness when we take off our bumper. So, now I'm gonna take an 18-millimeter socket to remove the two nuts on these studs that are connected to the bumper holding it to the frame. And then we can repeat that process for the other six studs. So these inner studs are gonna be a little bit hard to see how the bumper is set up, but I'm gonna use the same 18-millimeter socket and it's gonna be the same style. However, I'm gonna be using a hand ratchet, just because there's not a lot of room in here. And we can do that bottom stud. After all of the nuts are removed, we can go ahead and take off our bumper.So, before we go ahead and install our new bumper, I did wanna tell you guys a little bit more information about it, especially in comparison to your factory setup. Now, overall, you are gaining a couple of different benefits when switching to this tubular bumper by RedRock, but you are giving up some of those benefits that your stock bumper was able to allow you. Now, right off the bat, you can tell that this is gonna be a lot more durable, you're still getting that full front end protection and that front tire coverage with that heavy-duty stainless steel material, and you're also getting a bull bar up front, which is gonna be an add-on, in comparison to your factory front bumper. So you are getting a little bit of grille protection as well out of this.So, in comparison to your factory plastics, this is gonna be able to take a hit a lot better, with that heavy-duty stainless steel material. And it's also gonna have a nice textured black powder coat finish on there, that's going to resist any rust or corrosion on the metal underneath. What it's also gonna do is create a very aggressive and off-road look to the front end of your JL. Now, like I said, you are carrying over some benefits to this new bumper, but you also are compromising a couple in the meantime. Now, you're not able to swap over the factory fog lights on this like other standard bumpers may be able to allow. You also are not going to have any recovery points out of this new front bumper, this is mainly for that added protection, and it's also going to be for that aesthetic piece, creating a classic tubular look to the front end of your Wrangler. Now, what I do really like about this bumper is the fact that you are getting that grille protection, you still are getting that full front end protection. And even though you are not able to swap over your factory fog lights onto this, which is very common for tubular front bumpers, you still do have two light mounting tabs up on top in the middle there. So you can add onto this bumper down the road. If you wanna add any accessory or auxiliary lighting to this, you definitely can do that.So the other thing that I do really like about this front bumper is the fact that it's gonna have two rivnuts in the front there. So, you guys that live in a state that requires you to have a front license plate on your Wrangler, those are available, you don't have to outsource for any hardware, you don't have to do any DIY to this front bumper, and it even does come with hardware so you can mount up that front plate. Now, enough about these two side by side, let's go mount up our new one.So our first step to installing our front bumper is to install our mounting brackets first. So, you're gonna take the horizontal slots here, and we're going to mount this up to the front of our frame rail here, and then our bumper is going to connect on the side. So you're gonna take your hardware with your large flat washers. It's all going to be the same hardware, and we are just going to insert that through the frame rail, making sure that it sits as close to the middle as possible. And then we can take another flat washer and the nylon lock nut up provided and attach that to the back. So, then with an 18-millimeter socket and a 19-millimeter wrench, we can go ahead and tighten those up to our frame rail. All right. Then we can do the same thing on the other side.So what we can do is take our new bumper and slide this up into place. As you can see, these tabs that are attached to the bumper, those are going to attach to our brackets and they're gonna go outside of our brackets. So I would have your hardware staged, so you can make sure that this stays in place. So after those bolts are inserted through your bumper and through the secondary bracket there, what I'm gonna do is just hold this up into place, make sure that it's level and where I want it, then we can take the flat washers and the nylon lock nuts, and secure those down. This is gonna be the same hardware that we used to secure our brackets down. Now, with that sitting up in place where you want it, we can go ahead and tighten down those bolts using the same 18-millimeter socket and a 19-millimeter wrench. All right. Now we can do the same thing for the other side. Move up to the top one. All right. So once that's tightened down, then you're all set to go.That's gonna wrap it up for my review and install. Make sure you like and subscribe. And for more videos and products like this, always keep it right here at extremeterrain.com.
View Full TranscriptNow Playing

Wrangler JL RedRock 4x4 Tubular Front Bumper - Textured Black Review & Install
14:26
Subscribe: New Wrangler videos daily!
Subscribe to our YouTube Channel
Features, Description, Reviews, Q&A, Specs & Installation
| Brand | RedRock |
| Bumper Type | Full Width |
| Bumper Location | Front |
| Bumper Material | Steel |
| Bumper Finish | Black |
| Bumper Winch Mount | No Winch Mount |
| Bumper Fog Light Fitment | No Fog Lights |
Classic Off-Road Styling. Add classic off-road styling to your JL Wrangler with a RedRock 4x4 Double Tube Front Bumper that features an over-rider grille guard hoop. This RedRock 4x4 Tubular Front Bumper not only looks great, but provides practical protection from brush and other trail hazards.
Light up The Night. The perfect solution for night-time trail runners, the RedRock 4x4 Tubular Front Bumper features two mounting tabs on the grille guard hoop for use with any aftermarket auxiliary lights to ensure complete confidence in any night time adventure.
Heavy Duty Construction. RedRock 4x4 manufactures their Front Bumper from heavy duty, tubular steel for superior strength and rigidity. RedRock then completes the entire Bumper in a 2 stage finish using epoxy pre-coating and high-grade textured black powder coating for durability and long lasting corrosion resistance.
Direct Bolt-On Installation. RedRock 4x4 engineered their Front Bumper to be a direct bolt-on replacement for the original stock bumper reusing the factory hardware and mounting points. There is no cutting or modifications required for a clean straight forward installation. Installation can be completed in about 2 hours with just basic hand tools and the help of a good friend.
Application. This RedRock 4x4 Textured Black Tubular Front Bumper was designed for use on the 2018-2025 Jeep Wrangler JL models.
Freight Notes. Freight items can only be shipped within the continental 48 states, no expedited methods. What is freight shipping? Your Answers are Right Here.

RedRock J130038-JL
CA Residents:  WARNING: Cancer and Reproductive Harm - www.P65Warnings.ca.gov
Installation Info
Installation Time
(approx) 2 Hours
Difficulty Level:
Simple installation for anyone.
Installation Guides
What's in the Box
Review Summary


Installation Time: Afternoon
Jul 8, 2024
Great upgrade
This was an easy install that completely changed the look of our JL. Gives an old school look to your modern Jeep.
Jun 30, 2023

Not for a 22
Not designed for a 22. The lights that are already on that front bumper don’t jive with this one. I love the look but it doesn’t work.
Jun 3, 2023
Tube front bumper open box special
Bought this bumper as an open box special and aside from the very very minor scuff on the end cap of the one tube and a missing bolt it was basically like new. I love XT's open boxes they are awesome deals. The bumper is a little lightweight compared to my barricade bumper on my other JL but I bought this for more aesthetic purpose than extreme utility so it does what I need. Bolts up easily and simple instructions. Save the factory light wire harness to install aftermarket lights (splice or make a connection harness, I used the extensions and spliced them to the fog lights then connected to the factory harness plugs.) If you don't like the openness between the frame rails you'll have to fab a cover for that section. Over all very pleased with this bumper.
Nov 13, 2022
Easy install with 1 hiccup
Getting the bumper off was the only tricky part. I'm not a mechanic ;) if I can do it, anyine can. 2.5 hours install only cause I'm new at this.
Jul 19, 2021
Easy to install
This product is well built and it was simple to install. Easier then it showed.
Jun 8, 2021
Tubular Front Bumper
The front Tubular Bumper looks good. I am pleased with both the size and quality of the bumper. I feel it will offer good protection against any bumps or "goofs" while jeeping. It took just about two hours to take the original bumper off and put this one on. HOWEVER, the written instructions were for a different bumper. So were the online video instructions. Luckily I figured out how to get the original bumper off. Putting the tubular bumper on was easy. It fit with no problems. One thing I did was swap out the mounting bolts and nylon nuts that came with the tubular bumper with super strong gold bolts, lock washers and regular nuts. Just added security. Now I have to figure out a winch plate between the bumper and grill... Four stars because of the instructions.
Dec 17, 2020
Simple, clean, retro
This was the first step in giving my JL and old school look. Had my eye on it for a while but was hesitant about pulling the trigger. Then it went on sale, and it was a no brainer. Install was easy, the hardest part was getting the stock bumper off. Took a little over an hour with power tools. Fit was great, looks awesome, made well. The only downside is losing the front tow hooks but ill figure something out for that. Now to find some round lights for it.....
May 7, 2020
No No, Don't Do it!
Don't buy anything from Extreme Terrain, you will regret it, I do! Many other places offer the same items with good customer reviews!
Dec 28, 2019
Great buy!
Great for what it is, at a very reasonable price. Looks a lot better than the factory bumper, while also giving you more tire clearance.
Dec 27, 2019
Not worth it
This is not what I expected. It looked awful without a top covering the wide space between the grill and bumper. It also arrived slightly dented and within two rainy weeks it started rusting.