Installation Time
(approx) 1 Hour
Difficulty Level:
Light to Moderate mechanical skill required.
Installation Guides
No guide available for this part yet.
 FREE 1 to 3-Day Delivery on Orders $119+ Details

Add Details


Change Vehicle Color In Photo
Select Your Color
Verify parts fit & get product recommendations
M-F 8:30A-11P, Sat-Sun 8:30A-9P
 35 Reviews
$77.54 each
Saved - View your saved items
We're sorry. We couldn't save this product at this time.
or use
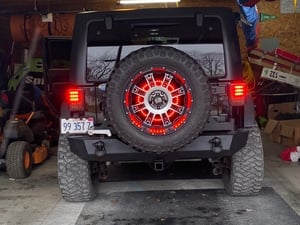
Hey guys, Adam here with extremeterrain.com. And today, we're taking a closer look at and installing the Oracle LED Illuminated Spare Tire Wheel Well Ring Third Brake Light, available for the 1966 and newer CJ and Wrangler models. You should be checking this out, very simply put, if you're looking for one of the most common rear-end LED accessories for the Jeep. Now, this guy here is almost a universal fitment for most Jeep models from the CJ era to the TJ, JK, and JL. This basically puts an LED red ring light in conjunction with your third brake light inside of your spare tire. This is an extremely popular mod for Wrangler owners and Jeep owners alike, just because it is just gonna stand out and really grab the attention of people behind you. Now, this uses extremely bright LED technology inside of that ring to illuminate with that third brake light. And as you can see, it far outshines that factory third brake light. It's super bright, super attractive, and very noticeable.Now, keep in mind, guys, depending on the style of wheel that you're running for your spare tire, it's gonna make a difference on how much of this ring you can actually see once your spare tire is mounted. As you can see, we have a set of Mammoth wheels here, and those spokes are super far apart. So we get a lot of that ring coming through. If you have a wheel that has tighter spokes with smaller space in between, you might get a little bit less of that ring, but regardless, because that LED is so bright, you'll definitely be able to see it. And what I like about it is that it kind of reflects off the inner barrel of that spare wheel, so it gives it a little bit more character. Now, again, being more universal, depending on the style of the spare tire carrier that you're running on your Jeep, may change up the install just a bit, but nonetheless, the actual ring itself has three spokes that allow you to attach it to the carrier regardless of style.Each one of those spokes has two different mounting points or mounting holes rather, that you'll use the included self-tapping screws to get installed. So, if you have something that's a little bit different than our factory spare tire carrier on our '14 JK, you'll be able to get it mounted up regardless, and you'll be able to tap it into your factory wire loom. Now, what we're gonna be doing is using the outermost hole at the top spoke and the innermost holes on the other two spokes, and then tapping it into our third brake light wire, which is right behind that spare tire. Again, maybe a little bit different. Obviously, this goes all the way back to 1966, which is gonna be vastly different than what you have here today. But nonetheless, you can get it done in the driveway at home. Price-wise, you're looking at about 100 bucks, which I think is a very worthwhile price because this stands out so clearly at the rear end and grabs everyone's attention. I think it's a pretty worthwhile price to pay with a relatively simple install.Speaking of which, I'm giving it two out of three wrenches on our difficulty meter because there is a little bit of splicing involved, but it does use very easy, quick splice connectors to get the job done. All you have to do is open up that wire loom or that wire harness coming off of the factory brake light. That, in addition to drilling three very small pilot holes, so the self-tapping screws go in a little bit easier, but that may be changing depending on the spare tire carrier you have on your Jeep. I'm gonna walk you guys through that entire process. What do you say we get started?Tools used in the install include a drill and a small drill bit for your pilot hole, an impact gun, 21-millimeter deep socket, Phillips head socket bit, or you can use a Phillips head screwdriver, pair of wire cutters, and pliers. First step, of course, we have to get our factory spare tire out of the way. Now, if yours is factory, it's gonna look a little different than this. Ours are aftermarket Mammoth wheels. It doesn't really make a difference to the install. Just make sure you're getting it out of the way. I'm going to grab my 21-millimeter deep socket and get the three factory lug nuts off. All right. From there, take the tire off.Now, if you're working with a factory spare tire carrier, this install is gonna be the same for you. If you've got an aftermarket one, you may need to make some modifications or it may look a little bit different for the install, but for ours, we're going to install it right here in the middle. Now, as you can see, the lug studs are a little bit in the way, so you can't center the connector up here. It has to be a little off-center. Now, whether you want to put this to the right or to the left is completely up to you. You can even put it somewhere toward the bottom if you'd like. I'm gonna keep it a little bit more toward the top just so our wiring is a little bit easier to reach the factory wiring for the third brake light. I'm gonna install this just like that. So I'm gonna use this top hole here that's inner, and I'm gonna use the outer holes for those two because these ones are in the center here. So obviously, it's not gonna work. So I'm gonna screw in this middle one first, and then hit the two ends.All right. So what I'm gonna do is set my bit...what I'm gonna do is take a Phillips head bit on my impact gun. I'm gonna center that, just making sure it's completely centered, I'm gonna go right in here at the top. Do the same thing for the other two, just making sure it's completely straight. All right. Repeating that for the other two. All right. It looks like the holes on the outer ones are a little bit more difficult than the top one. This is going into straight plastic, this one's got a little bit more of a metal ring around the edge. So I'm gonna drill a pilot hole. That's gonna be making it super easy to use the self-tapping screws included in the kit. So I'm gonna grab a bit smaller than the screws itself just to get it started, making sure that I'm not going in too deep because we don't have to go in too deep. Obviously, it's about a half an inch to a little bit more than a half an inch. So drill your pilot holes for the other two, and then we can tap them in. Perfect.All right. Same thing on the other side. All right. With those pilot holes in place, let's screw this guy in. Perfect. Repeat that on the other side. Now, how you want to wire these or where I should say will be up to you. If you wanna tuck it down a little bit farther, you can. If you wanna pull this plastic cover off and go a little bit higher, you can. I'm gonna go straight back right into this wire loom here. Either way, you're gonna need to grab a knife to cut this netting aside so we can access the two wires, the ground, and the positive underneath that. So, I'm just gonna use my knife here, make a small incision right in that net without damaging the wire. I'm gonna switch over to these wire cutters just to snip away some of this netting here, get a little bit better access to the wires underneath. Obviously, whatever tool you'd like to use to get that done is up to you. I just find this to be a little bit easier. Just wanna make sure you're not damaging any of those wires. That wire net is super stubborn. All right. Back over to my knife and just get that last bit off.So now we have easy access to the ground and the power to tap into. All right. At this point, we can pull this back a little bit and expose both wires. Take those quick splice connectors, and you're gonna clamp it onto the black and clamp another one onto the white. The black is your ground, the white with the orange stripe is your power. Now, if your colors are different than what we have here, you might wanna grab a light tester, hit the brakes, and see which one of these is actually your power and ground. But if it's the same color as ours, you know which one's which. So we're gonna take this clamp, insert that on there, grab pliers, clamp it down. All right. Once you clamp that down, it's gonna close up and snap shut. And that's how you know it's got a good bond with the wire underneath that black cover. And do the same thing with the white.Now, what we can do is bring up the LED harness on the back and it already has the male version, so these are the females. What we're gonna basically do is take the black wire from this harness and plug it in to the black connector that we just installed. All right. Plug that guy in and make sure it seats all the way. Plug in the red wire from this harness to the connector we installed on the white wire with the orange stripe. All right. Before you throw your spare tire back on, hit your brakes, or have a friend hit your brakes and verify that they work. And then we can put everything back together. Now, obviously, this next step is optional, but if you wanna clean this up a little bit and make sure this wire isn't just dangling here, I'm gonna run it right up against the back here and use the zip ties included in the kit to zip tie it back.Next, this is optional, but if you wanna clean this up a little bit so this wire isn't dangling there, I'm gonna run it right behind the LED bar there, and use a zip tie included in the kit to zip tie it up and back, and then we can snip off the excess of the zip tie. All right. At this point, you can just mount your spare tire once you know the ring light works. All right. If you have factory lugs, grab your 21 deep socket and tighten them down.That's gonna wrap up my review and install for the Oracle LED Illuminated Spare Tire Wheel Ring Third Brake Light, available for the 1966 and newer Jeep CJ and Wrangler models. You can get yours right here at extremeterrain.com.
View Full TranscriptNow Playing

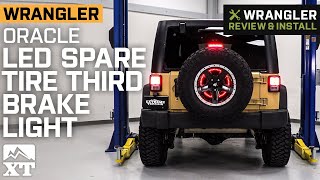
Jeep Wrangler Oracle LED Illuminated Spare Tire Wheel Ring Third Brake Light Review & Install
9:25
Subscribe: New Wrangler videos daily!
Subscribe to our YouTube Channel
Features, Description, Reviews, Q&A, Specs & Installation
Oracle 4211-003
CA Residents:  WARNING: Cancer and Reproductive Harm - www.P65Warnings.ca.gov
Installation Info
Installation Time
(approx) 1 Hour
Difficulty Level:
Light to Moderate mechanical skill required.
Installation Guides
No guide available for this part yet.
What's in the Box
Review Summary


Installation Time: Less than 1 Hour
May 9, 2024

I got a returned item
Luckily, I can MacGyver most anything. The order I received was clearly a returned item. I had enough stuff around my shop to make it work though.
Jun 1, 2023
Easy
Purchased this to ensure the guy behind me would stop too. Great light. Bright. Easy to install.
Mar 14, 2023
LED > Stock
Easy install, and really helps other drivers see your tail lights and wish they had a jeep to mod. It is bright! Installed on 2012 jeep JK sahara, had to clean out the old area and splice into wiring. No issues after 4 months.
Jan 31, 2023
LED Brake Light
This light really adds a nice touch to the look at night when the brake is applied. It certainly gets your attention more than the standard third brake light.
Jan 1, 2023
Nice product not too bad to install
Great look for the spare tire. LEDs are bright. Make sure you have the proper drill bit for metal to drill a pilot hole or you’ll be there for hours trying to get the self-tapping screw in the tire carrier.
Nov 30, 2022
Looks good! Easy install
Make sure you watch the video on how to install. Super easy step by step tutorial. Becareful not to cut wires when cutting net cover for splicing and adding new hardware. Product is bright and looks good!
Nov 7, 2022
Oracle led brake light
I saw this on the road on another jeep before I bought my jeep and knew I had to have this once I had my own jeep ! So cool looking!!! I went with the oracle brand without much research and without any issues we were able to install in no time . We did have to modify due to our camera set up but only meaning we had to turn it slightly no biggie . We also had to drill a pilot hole to make it secure but other than that it was easy to install , for me personally the tire was harder getting off . So far the light seems very bright and I’m hoping we will get a long time out of this product . We are doing many upgrades with lights so we are really looking into the oracle brand to go with overall for our light bars and all other off roading updates we will be doing for their high grade led lights . I will continue to do some reseach but so far this light has reached all expectations.
Sep 6, 2022
Looks awesome
Love this addition to my 2021 Rubicon! Really bright, and adds a lot of character.
Aug 6, 2022
Oracle LED brake light
LEDS are bright but, could use a better mounting system.
Jun 10, 2022
Oracle lighting power
The install was simple and took me about 30 minutes to do. Oracle provided everything needed to connect the wiring to the brake light. I am happy with the result and brightness.
Extreme always has exactly what I am looking for in many different price ranges for me to choose from. Ships fast and I have never been disappointed once the items arive.