Installation Time
(approx) 30 Minutes
Difficulty Level:
Simple installation for anyone.
Installation Guides
No guide available for this part yet.
FREE 1 to 3-Day Delivery on Orders $119+ Details
Add Details
Change Vehicle Color In Photo
Select Your Color
Verify parts fit & get product recommendations
M-F 8:30A-11P, Sat-Sun 8:30A-9P
Saved - View your saved items
We're sorry. We couldn't save this product at this time.
or use
Hey. What's up, guys? Ryan here from ExtremeTerrain and today I'm here with the Barricade Premium Bolt-On look Hood Deflector in textured black, fitting your 2018 and up Jeep Wrangler JL. Now, this is gonna be for the JL owner that is looking for some additional protection up front from road and trail debris. Now, the front of your Jeep, primarily the hood and that front edge is a very vulnerable spot for any rock, stone chips or debris that may get kicked up in contact with paint. What this is gonna do is it's gonna cause paint chips and that's gonna lead to rust, and that's something that nobody wants. This is a great solution for that issue and a very affordable option when compared to the alternative, which is getting your hood repainted later on down the line. This is a great way to change up the appearance of your Wrangler while adding some stylish protection and giving it that premium bolt-on look.This attaches very easily and as you can see, it's gonna provide plenty of coverage for the front end. This utilizes 3M double-sided tape. That's gonna stick to your hood and actually bolt in on the sides, utilizing your factory hood latches. So it's gonna make it a very secure item and it's gonna stay put in place. This is made from durable ABS plastic. As you can see, it's black to match your factory trim colors and that ABS plastic is very durable, lightweight, and it's impact-resistant, providing a lot of protection. This comes with everything needed to install and it does come in a textured and a smooth finish, so make sure that you choose the right one. Currently, this is the only option on the site for a hood deflector and it's a great option that. I think it's well worth the money, at right around $120 and it's definitely worth the added peace of mind. Now as far as installation goes, I'm gonna give this a very easy one out of three wrenches as you can get this thing installed in about an hour, just using basic hand tools. Now with that being said, let's hop into the install.Tools that we used for this install. Scissors, 3/8 drive ratchet, ¼-inch drive ratchet, marker, some painters tape, tape measure, 3/8 drive extension, T40 Torx, and a 10-millimeter socket.Now, this is a relatively easy install since we're dealing with an item that basically just glues and sticks onto the front and it's a really nice addition to your Jeep. Now, before we get started with the actual install, there's a few things that I wanna talk about. Since we are dealing with adhesive and double-sided tape, you wanna do this in an environment where it's at least 70 degrees or higher. That way this metal is gonna be nice and warm and that adhesive is gonna stick to it. The next thing I wanna say is just clean your hood. You wanna take some soap and water. You wanna clean the whole entire hood because it's gonna be sticking on there. We don't want any dirt or oil residue that's gonna keep that from sticking. Now we do get some cleaner in the kit, which is nice, but you wanna clean that ahead of time as well. Now, the way this thing attaches, it is gonna attach with some adhesive, but it's also actually gonna utilize your factory latches over here on the end and you're gonna pull those off and it's actually gonna bolt underneath of it. That way if, if that adhesive ever comes apart, that's not gonna fly off of your vehicle. So the first thing we're gonna do, we're gonna pop our hood because we got to access the nuts on the backside of this latch, that way we can take those off and get started.Once you get the hood popped, you can see we have access to the back of these hood latch sections right here on the hood. So what you're gonna, you're gonna have two nuts back here. We're just gonna take a 10-millimeter socket. Take both of these nuts off. Now, you wanna save that hardware because we are gonna put these back on. But we're gonna set them aside for now after we get them off, then we'll close our hood and get started. Set that aside and we'll close our hood. Push that prop rod back up in there. Just lay it down.First thing we're gonna install on this Jeep is these little tiny bumpers. These bumpers are gonna go somewhere about here on both sides. So what we need to do is we need to find the center of the hood. Now, nice thing about this is the grille has seven slots, so the middle slot is gonna be that middle spot. So you're gonna measure over. What we're gonna do is put a piece of tape here. We're gonna find the center of the hood. After that, we're gonna measure over and back to find a placement for these little guys. So I'm just gonna take a piece of painters tape and I'm gonna put that right there. Place those little guys up there and we can measure over. So in between here, we got about 3 inches. So you could do 1-1/2 right up there, or we can go all the way from the end of the hood and then just go all the way across. Fifty-three and a half. So after you find the center, we're gonna go ahead and mark this piece of tape, that way we don't have to draw on our paint.So after that, we're gonna measure over from here. So we're gonna measure over 15.5 inches. Do that. Keep an eye on where that is, then we're gonna measure back 4-1/2 inches. So once we get that measurement, we'll go ahead and we'll put this thing right about there. So you wanna clean this surface down here. Once you clean that, we're gonna go ahead and peel that backing and then we'll stick that right on there. So then we'll do the same thing on the other side. Measuring from that center line, 15.5 inches. Take our measurement, 4-1/2 inches back.So the next thing we're gonna do is attach this long piece of foam. This foam is gonna go right across the very front edge of this hood. You can see that I moved our little tape mark off of the hood. So what we need to do is we need to measure this 45 inches in length, then we need to cut it. It's a little longer than 45, so I'll go ahead and measure that out. After that, you wanna wipe down this edge, make it real nice, then we're gonna peel off this backing. So I'll peel this 3M off of here. And you want to find the center of this because we're gonna line it up with the hood and then we're gonna work our way out. And you wanna try to get this as close to the edge as possible when you're doing this. And while you're doing it, you wanna try not to touch this adhesive backing because the oils in your skin actually get on that adhesive and make it not stick. And you just wanna press down firmly on that. You can use a hairdryer if you want to just to heat it up, make it a little sticky and that way it'll stick on there.So the next thing we're gonna do, we're gonna take this surface cleaner that they give us. We're gonna wipe this whole front edge of the hood because we're gonna start sticking these little pieces on. And this is the way that this thing holds on. It has these little foot pads here. These are actually gonna attach to the hood. Then we're gonna drop bolts down through our deflector and they're gonna screw into this. So we only get one shot at this. We wanna make sure that we get all of them in the right place. So if you wanna lay it on top of there, kind of half-stick it down and then just check with that hood deflector, just make sure that you're getting them all in the right spot. We're gonna take our time, go very slowly. Like I said, I'm gonna put this down for right now. The next thing we're gonna do is just clean the surface. After that, we're gonna go ahead and peel this backing off of one of these guys. And what we're gonna do is we're gonna measure back from this hood edge 1-1/4 inch. So it looks like that winds up a little bit after this section right here. You wanna line it up with the center of the hood as well. So wanna keep all of those in mind while we're doing this.So the next thing we're gonna do, we're actually gonna install the deflector. So we're gonna install this center one right here. We're actually gonna put those latch ends back in, that way we can line this whole thing up and we'll get the rest of these installed. So you're gonna have this completely flat, smooth edge. You have this cutout edge, that's gonna go towards the actual windshield. So we're gonna just gonna lay this down over this. Line everything up. So with this hardware, you're gonna get these little bolts. They have a Torx head, so I'll tell you the size in just a second. And you're gonna get these little plastic washers. You can see that these washers have a little ledge right here, so we're actually gonna face ledge down, that way it lines this hole up. Then we'll drop this bolt down in and then we're gonna use a T40 Torx to go ahead and spin that bolt in and get it started. Then we're gonna take a ratchet and we're just gonna tighten this thing up, take a little bit of the slack out. So like I said, the next thing that we're gonna be doing is installing the side latches. Now, you really only need to get one nut on, but we're gonna face this little latch section up here and we wanna line both of those holes up and get that thing to sit down in there. So we're gonna lift our hood up just a little bit and then we'll get one of the nuts ever so gently started on the backside. Then we'll do the same thing on the other side.The next thing we're gonna do is take a marker, and what we wanna do is just go and mark all of these holes. After we mark all those holes, we're gonna pull this thing back off. We'll get all this thing lined up and then we'll stick those new ones on. So you want a thin marker that's gonna fit through these holes. What we're gonna do is try our best to get right in the center of those holes, that way our little feet pad that we install are gonna be pretty lined up.So like I said, the next thing we're gonna do is pull this back off. So what I'm gonna do, just pop our hood a little bit. We'll go ahead and start by taking our little latches off first. And we'll just unthread that nut, pull that latch off, then we'll do the same thing on this other side, and then we'll take the center bolt out. Once we get that out, pull this deflector off, and then you can see all the holes that we marked.So now that we got the hood deflector off, you can see we have all of these marks. Now, the reason we made these marks is because of this little template. This template has a hole in the middle, and this is roughly the size of those new little stick-on things. So what we're gonna do basically is go around, we're gonna line each one of these holes up with that dot, and then we'll make tape marks around it. That's gonna give us our precise spot that we need to stick those things on. So with this kit, Barricade's gonna give you these strips of tape and what you can do, you can actually cut these in half and make a lot more than there are, but there is already 12 of these, which is 2 per spot. So what we're gonna do is just go ahead and we'll cut these in half and then we'll start getting our holes lined up.So we'll take our pedestal alignment template and place that over that little dot that we made. After that, we'll peel one of these strips off right here and then holding this in place. I'm just gonna go like this. Now, if you want to, you can do this all the way around or you can just make a little corner that this thing's actually gonna slide into.So at this point in time, we can sit the rest of these things on. After you get them on, you can pull these tape marks off. Also, if you have not pulled off this little centering mark here as well, you can pull that off. So we're gonna go around, try to place all these as close to these edges as possible and then we'll pull these tape marks off and then we'll get this thing actually installed. So same thing. We're gonna pull off that red backing and then we wanna line this up with these little corners just like that. Also, if you wanna go over this and just clean these areas again, just in case you got any fingerprints or anything on that, that would be a good idea.So at this point in time, we're gonna reinstall this deflector. Same thing. Gonna lay this over top of here. We'll get some of these bolts started and as you can see, I did a pretty good job and these are all lined up. Not bad. So we'll run across, we'll get all these bolts installed. Now, remember, these bolts, that washer, you want that raised edge, that little ledge to fit down into there. That's gonna center everything. We'll get the side latches in, we'll get this whole thing tightened up and bolted down, then we'll be good to go. Now, I'm not gonna tighten these fully until we get to the very end because we wanna make sure that we can line up this side and get that latch section back in. So I'm just gonna get them most of the way tight, working my way down. These are pretty tough to get these to thread into the hole. You wanna make sure that you don't cross-thread them. Once you get them started, they're pretty easy to go in. All right. So let's get this in section in.So we have our hood popped. The next thing we're gonna do is install those side sections for the latch. Just like we pulled it apart, we're gonna put this back in. And you wanna face this little notch upward, bolt goes through, then we'll reinstall those factory nuts, then we can tighten it up with a 10-millimeter. So we're gonna pop our hood again. We'll get this other latch installed on the opposite side of the other side that we've already installed.So now that we have these side latches on, next thing we need to do is close your hood and that way we can tighten all those bolts across the front. All right. Then we'll take that same T40 Torx. We'll just go across, tighten them all up. Now, once you get them all tightened up, you wanna torque them down to 20-inch-pounds.So that's gonna wrap it up for my review and installation. For more videos and products like this, check us out at extremeterrain.com.
View Full TranscriptNow Playing
Jeep Wrangler JL Premium Bolt On Look Hood Deflector Review and Install
17:12
Subscribe: New Wrangler videos daily!
Subscribe to our YouTube Channel
Features, Description, Reviews, Q&A, Specs & Installation
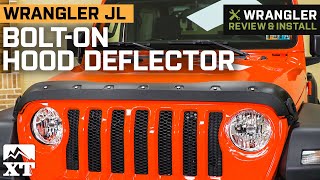
Road and Trail Debris Immunity. Install thisPremium Bolt-On Look Hood Deflector to safeguard the hooded façade of your JL Wrangler from stones, pebbles, and other projectiles. A hood deflector, often known as a Bug Guard, provides all of the advantages of a standard vehicular brace without the inconveniences.
Car-Grade Polymer Construction. The Premium Bolt-On Look Hood Deflector is made of automotive-grade acrylonitrile butadiene styrene (ABS). ABS is the best material for usage on and off the road because of its reduced weight, outstanding sturdiness, and damage tolerance. This Hood Deflector has an OEM-style smooth texturedfinish that blends in nicely with your Wrangler's standard trim.
Warranty. This product comes with a 5-year limited structural warranty that covers all manufacturer damages and flaws prior to delivery or installation. Limitations may apply to this warranty.
Installation. This product does not require professional installation and would take at least 30 minutes to mount.
Application. The Premium Bolt-On Look Hood Deflector fits all 2018-2025 Jeep Wrangler JL models.
Fitment:
CA Residents: WARNING: Cancer and Reproductive Harm - www.P65Warnings.ca.gov
Installation Info
Installation Time
(approx) 30 Minutes
Difficulty Level:
Simple installation for anyone.
Installation Guides
No guide available for this part yet.
What's in the Box
Review Summary
Installation Time: Less than 1 Hour
Aug 26, 2024
Bolt on look bug deflector
Excellent addition to the front of our JL. Shipping was fast, the kit arrived as expected. No parts missing, deflector in good shape, instructions included. My only caveat is to follow the instructions to the T and lastly to check the layout of the adhesive pads for screwing the deflector down. I found the exact center, and measured the correct number to the center of the other pads. However, the number 2 and 3 pads had to be moved. Tape them in place temporarily, THEN after confirming placement peel and stick! Looks nice and should protect the hood well! I would recommend this product for anyone interested in a custom look bug defector.
Jul 16, 2024
DIY Bolt-On Hood Deflector
Excellent Product, great fit, durable textured appearance, high quality item at a great price point...highly recommended add-on.
Jun 3, 2024
2024 wrangler
Instructions make it more complicated than it needs to be and the video on extreme terrains website isn't 100% correct. The best way is somewhere in between. Once you get past that confusion it is actually a very simple install and seems high quality
May 16, 2024
Bolt on Look Hood Deflector (textured)
It was reasonably priced, shipped quickly and packaged well. I watched two separate install videos one on the smooth and other on the textured. Took my time and it installed fine in about 30-45 minutes or so (just double checking as I went). It’s been on for about a week or two and I really like the look of it. So far so good and I’d recommend it if you’re thinking about it.
Dec 6, 2023
hood deflector
heavy duty really protects front of jeep,looks real sharp.
Oct 16, 2023
Good deflector
The product was fine. It was the order placement and shipping process that was disjointed. I received an email to review my product when it wasn’t delivered yet. Difficult to find details after the fact but got a quick response from extreme but their vendor that ships their products was not easily accessible to find the status of my order
Sep 11, 2023
Rugged Look
This added a rugged bling to our Sarge Green Jeep!! Love the look
Sep 6, 2023
Extreme look and attitude
So this product was super easy to install. All you need is a 10mm socket and rachet. Make sure when you reinstall your hood latches don't overtighten the bolts, otherwise it will crack the plastic and your latch anchors will fail. Ask me how I know lol. Also make sure you have a person helping you because it will be centered alot easier.
Jun 16, 2023
Great Product!!
Product arrived on time, packaged well, look is outstanding…..the installation video on the website was very helpful with install.
Apr 1, 2023
clean winsshield
looks great protects windshield great keeps bugs and stones off wondshield