2018-2025
 2007-2018
 1997-2006
 1987-1995
 1976-1986
Installation Time
(approx) 2 Hours
Difficulty Level:
Simple installation for anyone.
Installation Guides
No guide available for this part yet.
 FREE 1 to 3-Day Delivery on Orders $119+ Details

Add Details


Change Vehicle Color In Photo
Select Your Color
Verify parts fit & get product recommendations
M-F 8:30A-11P, Sat-Sun 8:30A-9P
 17 Reviews
1 Answers
17 Reviews
1 Answers
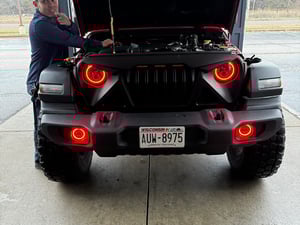
Merideth: What's up, guys? Merideth with extremeterrain.com. And today, we are checking out the ColorSMART Chasing RGB Halo LED Headlights and Fog Lights with the Black Housing and Clear Lens, fitting all 2018 and newer JL Wranglers. I do wanna note right up front that these fog lights included in the kit will have the three-point mounting system and not the four-point mounting system. So, just make sure you peek at your fog lights and make sure that you're getting the right ones for your setup because models do vary. Now, if you have the correct mounting points and want a flashy headlight and fog light combo to liven up and modernize the lighting on your JL, especially if you take your Jeep to shows, this is gonna be a good choice to look into. Now, in addition to the core styling, these will also just outperform the factory halogens if you've been having a hard time with lighting performance and want an upgrade to see better when you're driving in lower light and want a custom option to do it with.Now, the obvious feature here is the RGB capabilities, which set these apart from a lot of other traditional lights with a standard white halo. Now, the halo in all four lights will tie together and have a million colors, literally a million colors, and 22 different modes, music sync, timing functions, sound sync, and more so you can control these, all of those functions with a handy remote and change them on the fly. Now, they'll also have a yellow turn signal tie-in, which some combos don't include, and I think that that's a nice bonus on top of the other features that you're getting here. Now, aside from the fun aspects that these have, one of the most functional features is the multiple LED projectors on the inside. Now, those will throw a lot of lighting on your path that is condensed so you won't have to strain your eyes when you're driving at night anymore, and they'll have a 6,500 to 7,000K color temperature to stay on the cooler white side, unlike a scattered and warm tone halogen bulb.This set will have a 7-inch LED headlight in the middle and a 9-inch mounting bracket to fill that extra space in the grille and cater to those OE-style mounting points on the JL. And the back of the headlights and the back of the fog lights will be made of a die-cast aluminum construction, which will disperse the heat evenly, keeping the LEDs running very efficiently, and the front will have a polycarbonate lens that will be impact-resistant while remaining crystal clear. Now, in addition to the sturdiness of the exterior here, these will also be IP68-rated, meaning that these are gonna be shockproof, waterproof, and dustproof to protect the headlight itself and the LEDs inside. Now, another big thing to rest assured about with these headlights and fog lights is the fact that these are DOT approved. So even though you do have some extra fun features out of these, they still are going to be up to those standards.This kit is gonna come in at roughly $550, and I think that that's relatively affordable for what you're getting out of this package here. You're getting both a headlight and fog light combo that is full LED and has some extra features to it, and you're getting all the wiring adapters and a remote is going to allow you to customize your Jeep on the fly, which most traditional headlights aren't going to offer. This is also gonna have a catalog of colors, modes, and other features that sets this apart from some of the other choices when it comes to RGB halo options. Now, I think if you're looking for a little bit of that extra, if you don't mind some of the wiring here, as you can see, you are gonna have to do a little bit. If you don't mind that extra work, you wanna save a couple bucks when it comes to a full package and really get that custom peel-out in front of your JL, this is gonna be a great choice to look into.Now, install for both the fog lights and the headlights will be rather easy at a one out of three wrenches on the difficulty meter. It should only take you about two hours to get the job done. Now, you are gonna have to do some minor wiring here for some of the features. However, it is fairly simple, and we'll show you how to do that in just a second. Now, at this point, we can head over to our shop and take a detailed look at the full breakdown on how to get these onto your JL at home. So that is gonna wrap it up for my review. Let's go ahead and get into the install.Male: For this install, you will need a 3/8 ratchet, a 3/8 and 1/4 adapter, a 3/8 and 1/4 extension, a 10, an 8, and a 7-millimeter socket, a T20 torque socket, a clip removal tool, wire crimpers, and wire strippers. All right. Today, we're gonna be installing some headlights and fog lights on our Jeep Wrangler. But first, we're gonna watch a video how to install our stock headlights, and we'll come back here to uninstall the stock fog lights.Woman: All right. So the first step in our install is to remove the pop clips that are holding on our grille. So let's grab a pop clip removal tool and get these out. All right. So the rest of the grille is attached along the bottom and sides with pop clips. Firmly grab the grille and pull back towards you, and you should be able to remove it. All right. With our headlights exposed now, we can grab a 10-millimeter socket if you can find one, and go ahead and zip the three bolts that are holding on your headlight. Pull your headlight off, locate the connector at the back, press down on the connector, and remove it.Male: All right. To remove our fog lights, first thing we need to do is we need to remove our lower splash shield. There's some plastic clips in the front and two 6-millimeter bolts underneath that we need to take out. All right. We have our two bolts here and here, and our six plastic clips that run along the front. We're gonna take our bolts out first. All right. And grab your clip removal tool and take out the clips. All right. We're gonna come to the front of our wheel liner and take out our two 8-millimeter bolts to access the wiring to our turn signal and marker light. All right. Now we can come to the inside of the bumper and take off our panel to access our fog light. There are seven 6, 7-millimeter bolts going all the way around. All right. Now we have access to our fog light. What we're gonna do is disconnect our connector and take out our three T20 screws on the sides. Take out the connector, push down the tab, pull out, and grab a ratchet with a T20 bit and take those screws out. All right. Now we get to repeat that same process for the other side.All right. Before we get to installing our hardware, what we need to do is get our wiring ready. We have two extension harnesses and our fog light harness that we need to attach connectors to. You can attach your wiring however you like. What we're gonna use on ours is a T-tap and a spade connector. What it's gonna do is it's gonna clamp over the factory wire and then the spade connector will go in the end of the T-tap. So we're gonna grab our one extension wire and we're gonna strip our wire back. All right. We're just gonna take our wire strippers and just strip this back a little bit more. Take our connector and take our wire crimpers and clamp that down. All right. We're gonna do the same thing for our two wires on our fog light except we don't need to strip them back anymore. All right. Now we just do the same thing for the other extension wire and the other fog light. All right. Now here we have our wiring for our RGB controller. We have our wires labeled for our left side of the vehicle, wires labeled for our right side of the vehicle, and then we have our main hub wiring. So what we're gonna do is we're gonna run our main hub wiring and our left side wiring right behind the rad support and we're gonna connect our main hub wiring right behind the driver side headlight. All right. So I'm just gonna take these wires now, just run them behind the fog, the wheel liner, just get them out of the way. All right. And then here we have our wiring for our main hub. We have our ground, our power, and then our turn signal wires. So what we're gonna do here is we're gonna hook up our ground. This ground stud right here, it's a 10-millimeter nut, just loosen it a little bit and then we'll tighten it over the stud. All right. Now we can run our wiring for our turn signals and our power wire. All right. Now we're gonna run our wire for our right side turn signal. The yellow wire on the harness is gonna be our right side. We're gonna take our extension harness, plug that in, and then run that along the front to the right side. All right. Now you can run your wire however you want. You just wanna make sure that you zip tie it up out of the way so it doesn't touch anything hot. We're just running ours for demonstration purposes up over the front and under our grille and just laying our box behind the headlight. I would recommend securing everything down.All right. While we're here, we can just plug in our extension wire and our power wire for our right side. So we're gonna take our extension wire that's gonna go into our green wire. I'm gonna take that and we can just run the rest of that right under our fender liner. All right. And then for our power wire, what I did was just make a simple jumper wire. It just has two state connectors on our ends because there are two female connectors. So we're gonna plug that into red for power, run it through the fender liner, and then that is only on this side and that will run through the power for the marker light. All right. Now that we're here in the wheel well, we have our power for our marker light that's gonna go to our power for our controller. And then we have our extension for our turn signal. That's gonna go into our power for our left side turn signal. Just check your wiring diagram, just make sure you're plugging into the right wire. All right. Just tuck the wires out of the way and then you can repeat on the other side for just the extension wire for the turn signal.All right. Now that we got our headlight, we're ready to install. What we need to do is attach our supplied adapter harness, got a three-prong plug, plug that in, and then this will plug into our factory harness. And then we have our wire pulled up that's labeled for our left headlight for our RGB. It's only gonna plug in one way, there's a little notch, and then a screw locking tab. All right. Secure the wiring behind. All right. We're going to locate our headlight in place and then it will be installed with our factory 10-millimeter bolts. All right. Let's grab our ratchet and tighten them down. All right. We can go install our fog light now. You can see how we have our T-taps on our harness. So we're gonna plug our red into power, black in the ground. All right. And now we can mount our fog light.All right. We can now mount our fog light with our three T20 screws that we took our stock one out with. All right. Now we can take our RGB wire that is labeled left fog light, plug our fog light in. All right. Now we can plug our RGB light in for our fog light. You can see it's labeled left and fog light. Same thing as a headlight. It just slides in in a screw locking tab. And then we can take our extra wire and just tuck it up behind the bumper. All right. Now we can reinstall our plastic cover that covers our fog light. And then we can reinstall our 7-millimeter bolts that we took out around. All right. All right. Now we're just gonna put our rear liner back in place and install our two 8-millimeter bolts that we took out earlier. All right. Now we just repeat that same process for the other side.All right. Now we can go underneath and reinstall our plastic splash shield on the front. So we're gonna slide it up into place. And then we can reinstall our plastic push pins in the front and our two 7-millimeter bolts in the back. All right. All right. We're gonna reinstall our grille. We're gonna slide it in place, lock our locking tabs in the front, and then put our plastic push pins back in. All right. Now we're just gonna show you through some features for the headlights. As you can see, there's an app control. There's also a remote. For the app, you can change the colors. Go here and you can change the modes. There's a ton of different modes that you can pick from. And then you can also do the same thing from the remote. Pick your colors and then change the mode. All right. And that wraps up our install of our ColorSMART Chasing RGB Halo LED Headlights with Fog Lights with the Black Housing and Clear Lenses for our 2018 and newer Jeep Wrangler JL. And remember, for everything Wrangler, keep it right here at extremeterrain.com.
View Full TranscriptNow Playing

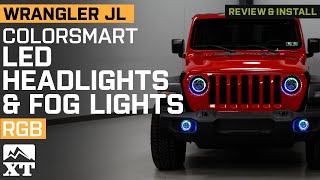
Jeep Wrangler JL ColorSMART Chasing RGB Halo LED Headlights Review & Install
19:08
Subscribe: New Wrangler videos daily!
Subscribe to our YouTube Channel
Features, Description, Reviews, Q&A, Specs & Installation
Robust Case. These units, crafted exclusively for 2018-2025 Jeep Wrangler JL Models, deliver a stunning 4200 high lumens and 3200 low lumens. With 45 Watts per headlight and 30 Watts per fog light, they ensure optimal brightness. The robust black die-cast aluminum alloy case promises durability, while the clear polycarbonate lens guarantees clarity.
Distinct Light. These lights boast a versatile 10-32 operating voltage for the high/low beam and feature a distinctive yellow turning light. IP68 waterproof rating ensures they stand strong against the elements. Integrated CREE LED RGB DRL provides a vibrant halo effect, making your Jeep stand out. Choose ColorSMART and redefine your night-time driving experience.
Installation. Putting these ColorSMART Chasing RGB Halo LED Headlights with Fog Lights on your ride is easy and requires no drilling.
Warranty. There is a 1-year warranty on this product.
Application. These ColorSMART Chasing RGB Halo LED Headlights with Fog Lights fit all 2018-2025 Jeep Wrangler JL Models.
CA Residents:  WARNING: Cancer and Reproductive Harm - www.P65Warnings.ca.gov
Installation Info
Installation Time
(approx) 2 Hours
Difficulty Level:
Simple installation for anyone.
Installation Guides
No guide available for this part yet.
What's in the Box
Review Summary


Installation Time: Afternoon
Jan 18, 2024

Great Looking Headlights but First Run JLs my Have an Issue
The install of this was pretty easy overall. I have the JL with the optional switch assembly, so I didn't have to wire the switch that was included.. I Just had to splice the new leads into the JL switch assembly. I already had the grill off, to do a grill insert and bull bar, so I had easy access to the headlights. The included adapters, allowed for a quick swap, and the brackets fit perfect. From there I moved onto the fog lights. That is where the issue came in. Apparently some of the first run JLs have a different mounting system for the fog lights (JK style). As a result, the included brackets provided, did NOT fit. After a little digging I did determine the issue the fact Jeep decided to use the JK set up on some JL models. So I was able to find a set of brackets, and over a week later, I was able to swap the included ones out with the newly acquired ones. Once I got that done, it was easy peasy. If you have an early run of the JL it would be in your best interest to confirm the style of fog light bracket though. Otherwise you will have to do double work putting things back together, until you find a replacement bracket. - Great Brightness - Lots of color options - Easy Install (except bracket issue) - Well packaged
Feb 2, 2025
Review shared from 7-Inch LED Projector Headlights; Black Housing; Clear Lens (76-86 Jeep CJ7; 97-18 Jeep Wrangler TJ & JK)
Projector headlights
Perfect update for my jeep. Much better than the old halogens!
Sep 15, 2024
Review shared from 7-Inch LED Headlights and 4-Inch LED Fog Lights with ColorSMART RGB; Black Housing; Clear Lens (97-18 Jeep Wrangler TJ & JK)
Look and work great
These lights are not exactly easy to install but not too difficult. Plan on a good 3 to 4 hours to do it right like I did by wrapping and hiding the wires properly, please save yourself time and money by putting a little dielectric grease on all of the connectors. Rather than cutting or splicing the running light wires to get the power for the blinkers and halos to work properly I just bought the running light wire harness Y kit that were reasonably priced considering that my stock harnesses are intact and easily returned to stock.
Sep 27, 2023
Review shared from Chasing Version 7-Inch LED Headlights and 4-Inch LED Fog Lights with ColorSMART RGB; Black Housing; Clear Lens (97-18 Jeep Wrangler TJ & JK)
I love them
Took my single candle powered headlights to WOW. To properly adjust the Fog lights I had to turn them upside down to get them to aim the way the 2024 jeeps are aimed. other then that I wish the software could be progrmmed to not allow certain colors per state law but it all works as described.
Jun 20, 2023
Review shared from 7-Inch LED Headlights and 4-Inch LED Fog Lights with ColorSMART RGB; Black Housing; Clear Lens (97-18 Jeep Wrangler TJ & JK)
Just okay
I had them installed about 2 months ago. They would flicker constantly and sometimes the connection would be loose the lights wouldn't turn on at all. I realised the connection point was too short.. That's why they would flicker/ not work. I had to use electrical twine to hold the connections together... What a pain in the ass for headlights if you ask me.... Update. I'm experiencing the same issue with the fogs....
Apr 9, 2023
Review shared from ColorSMART RGB Halo LED Headlights with Fog Lights; Black Housing; Clear Lens (18-25 Jeep Wrangler JL)
Pleased
Took about 3-4 hours to install myself. Ran RGB lights to 15amp Aux switch I have so I can manually control when they're on. I use the HappyLighting app to configure the lights. Which works with my undercarriage lights, so they're sync'd up. Headlights are pretty awesome. Way better than stock.
Mar 22, 2023
Review shared from 7-Inch LED Headlights and 4-Inch LED Fog Lights with ColorSMART RGB; Black Housing; Clear Lens (97-18 Jeep Wrangler TJ & JK)
Love these lights!
Love these lights! The only reason for 4 stars instead of 5 is there are no instructions for install, so I had to go through a few you tube videos to get it done.
Dec 25, 2022
Review shared from 7-Inch LED Headlights and 4-Inch LED Fog Lights with ColorSMART RGB; Black Housing; Clear Lens (97-18 Jeep Wrangler TJ & JK)
Perfect lights for the JK
These are great. They were easy to install and look wonderful. I bought these for my daughters Christmas present. Best present ever.
Nov 28, 2022
Review shared from 9-Inch Adjustable Angle Beam Headlights with X-HALO RGB DRL; Black Housing; Clear Lens (18-25 Jeep Wrangler JL)
Amazing
Love these lights. Being able to change the colors gives my Jeep different looks each time.
Nov 20, 2022
Review shared from 7-Inch LED Headlights and 4-Inch LED Fog Lights with ColorSMART RGB; Black Housing; Clear Lens (97-18 Jeep Wrangler TJ & JK)
Worth the mod
These are a reasonably priced alternative to similar RGB headlights with controllers. Good level of brightness and color options, not a terribly difficult install.
5 Top Rated Questions
Q: what size is the headlight? How many inches?
A: The headlight is 7-inch diameter LED sealed beam, but fits into a 9-inch Jeep Wrangler JL or Gladiator headlight hole with the included adapter ring.