2024-2025
 2016-2023
 2005-2015


Installation Time
(approx) 3 Hours
Difficulty Level:
Light to Moderate mechanical skill required.
Installation Guides
No guide available for this part yet.
 FREE 1 to 3-Day Delivery on Orders $119+ Details

 31 Reviews
4 Answers
31 Reviews
4 Answers
$629.99 each
Save with Open Box
From $377.99
Will this fit your Vehicle?
Saved - View your saved items
We're sorry. We couldn't save this product at this time.
or use
Add Local Installation
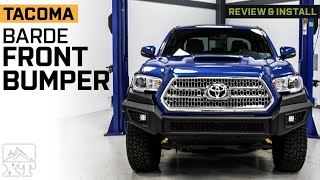
Jake: Jake here for ExtremeTerrain. And today, I'm taking a look at the Bard Front Bumper, fitting 2016 to 2023 Tacomas. This bumper is going to appeal to the Tacoma owner who wants some serious protection and clearance for their truck. With the flexibility to mount accessories, plus some additional lighting that's included with the kit, this bumper is going to give you everything you need to get the front end of your Tacoma looking aggressive and functioning the way you want for one of the best prices in the category.Now, replacing your front bumper can seem like a bit of a daunting modification, but it's one that can have huge impacts on both the look and functionality of your truck. Now, stylistically, this is obviously a big departure from your original factory bumper. It's much smaller, it's more low-profile and aggressive-looking than the original, and it cuts up a lot closer to the body of the truck. Now, since it cuts up much closer to the body and it's narrower overall, it's also going to give you a lot more clearance in the front end. So you'll have a much better approach angle for when you encounter obstacles out on the road or especially on the trail. It's very much a pre-runner-type style bumper because it doesn't have a winch mount, but you do have a large skid plate involved here too. And you've also got these pieces that sit right on the edges here, and these are going to mold pretty much perfectly to the bottom part of your headlights. So, it makes for a really unique, aggressive type of look.Now, you also get two LED cube lights included for the outer portion of the bumper right here, so you don't lose your fog lights. Now, in the center, you can leave the grille installed as it is right here, or you can take this out to make room for additional lighting or other accessories. You also get a license plate mount bracket included for those of you who live in a state that requires front plates. And again, we've got that big old skid plate down here that you're going to see. It's got a nice logo in it, and it's pretty thick, hefty stuff here too. So you're going to have a pretty cool look. Again, it's going to speak more to that pre-runner or Baja-type of style. Now, this is designed to be a direct bolt-on for your stock bumper as well, so you don't need to make any modifications to get it fitted.Construction is also quite stout, despite the bumper's small size. The bumper itself is constructed from steel and it's finished off in a multi-layer coating. The steel is pre-treated to remove impurities, then it gets a phosphate layer to prevent any rust or corrosion before the coating is applied. Next is an E-coating, which is then topped off with the textured black powder coat that you see here. So this should be able to stand up to the elements and prevent rust and corrosion from happening. Now that's gonna be the same thing here on your skid plate and on these other accessory pieces on the edges too. Now that steel construction also means that this is super solid. So between the material and the coating, if you're encountering obstacles out on the trail, it can certainly take a beating.The mounting brackets are also finished in that same steel and the coating as the bumper itself too, so the whole setup is gonna be very solid. And those cube lights that we were talking about earlier are IP67 waterproof rated. Between that and the LEDs, they should also stand the test of time. They've got a nice aluminum housing here in the back that's finned. And you've got a polycarbonate lens over the four LEDs here too. Plus, you've got the pigtails already set and ready to go. So, you can just pretty much run power on the ground using the supplied cable and switch and you're ready to get those on as well. Now, one other cool thing about this that I wanted to mention is that these wing pieces actually fold. So when you take it out of the box, these are folded over onto themselves. Now it's not necessarily something that you're gonna utilize while it's on the truck. However, I think it's cool and it's worth noting while we're up here anyway.Pricing comes in at about $600, and that makes it one of the most affordable full-width bumpers on the market for this gen of Tacoma. Now again, like I mentioned earlier, this one doesn't include a winch mount or a big overrider bar, or a bull bar, but you do get some serious extra protection. If you want that clearance, this is a great way to get it for a really reasonable price because it's got everything you need and really nothing that you don't.Installation gets a two out of three and should take you about three hours to complete. This is a totally bolt-on setup like I talked about earlier. It doesn't require you to make any modifications to your truck. It uses all those factory mounting points. You're just going to swap this right in place of your factory bumper. Now, these things can be cumbersome and despite the size of the bumper, this is still pretty heavy. So, for ease and safety, I would highly recommend getting a friend to help you get your original bumper off and get this new one into place. That's really all I've got to say about it here. So, with that, why don't we head out to the install bay and we'll show you the whole process?Man 1: For this install, you will need an impact, ratchets, 3/8 to 1/4-inch adapter, 3/8 1/2-inch adapter if necessary, 4 and 5-millimeter Allen sockets, 10, 12, 13, 14, 16 swivel and 16 deep and 18-millimeter sockets, 16-millimeter ratcheting wrench, 18 and 19-millimeter wrenches, angle cutters, a clip removal tool, some tape, and a box cutter. What's up, guys? Today, we're going to be installing a new front bumper on our Tacoma, but before we get started we're going to send you to watch a short video on how to remove your factory bumper and we'll see you when you get back.Merideth: So, the first step to our install is to take off our grille. You're gonna need a 10-millimeter socket for this and you're also gonna need a trim removal tool. So, we're gonna take out the bolts first. There are two up at the top. I'm gonna use that 10-millimeter socket to remove those. And then we can remove the clips on either side. So, over on this side, on either side of the grille, we're gonna just have a pop clip. What I'm gonna do is just take the trim removal tool and pop that out of place. Then we can do the same thing for the other side. So, at this point, now that the hardware is out of our grille, we can just go ahead and remove it by pulling forward. And then what we can do next is start to disassemble our bumper.Our next step is to take off our lower splash shield. Now, on either side, there's gonna be two bolts behind this splash shield. I'm gonna be removing those with a 10-millimeter socket and then the remaining bolts are gonna be on the front side of the splash shield. This may be a little bit difficult to see. However, I'm gonna use a 10-millimeter socket and a small extension just to give myself some room to work with. So, before you remove the front bolts, I would just repeat that process with the bolts that are behind the splash shield on the other side. And then we can take that same 10-millimeter socket and remove the bolts on the front.So, once all the bolts are removed, we can remove the lower splash shield. So, our next step is to remove the first two bolts on the inside of our wheel well here. We're missing one down at the bottom here as you can see, but we still need to remove this one up at the top. This is gonna allow us to pull our fender back so we can unclip our bumper on either side. So, I'm gonna take a 10-millimeter socket and remove this bolt up at the top. You should also use a 10-millimeter socket for this one down at the bottom. Once that's removed, what we can do is start to peel the fender away from the bumper. It's gonna be held in by clips as well as adhesive. Now, if you are taking this off for the first time, it may be a little bit more difficult just to pull the fender away with the adhesive being there, but you can take a soft pry tool and you can just pry away from the bumper. If you need to, what you can do is just use that pry tool to unclip the bumper.As you can see, it's disconnected there. So, then we can repeat that on the other side and then we can unclip the middle part of our bumper. So now that we disconnected our fender, there's a little bit of hardware underneath that's connecting our front bumper cover to the crash bar as well as to our wheel well. Now, there's a pop clip in the corner that we're gonna disconnect using a trim removal tool. Next, we can remove that bolt that's holding the bumper cover to our crash bar with that same 10-millimeter socket that we used before. Then we can repeat that on the other side and then unclip our bumper at the front.So before we remove the clips that are holding on the front of our bumper, we do need to disconnect this wiring harness here. We just have to press down on that tab and pull back. Just wanna make sure that we're protecting all of our wiring harnesses before we pull the bumper away from the truck itself. Then we can grab a trim removal tool and start removing our clips. So next, I'm gonna take that trim removal tool, just like the one that we used on our grille, and we're just gonna take off these clips that are holding on the front of our bumper cover.So now that all of our clips are fully removed at the front, what we can do is remove our front bumper cover. So, our next step is to take off our crash bar here. We're gonna have three studs and we're gonna take that hardware off with a 14-millimeter socket. I'm also using my electric ratchet. Then we can take off the three on the other side and then pull off our crash bar. So, we can remove our crash bar. Now, mine's giving me a little bit of an issue just because it's been on for a long time. I'm gonna take a diablo and just tap it off.Man 1: Alrighty, guys, welcome back. Now that we've got everything off, we're going to go ahead and get ready to put on our new support brackets for our bumper. Now, these are provided in your kit and they will be embossed with a P or a D for a passenger or driver. So we're going to install those in the factory crash bar locations and reuse our factory crash bar nuts to go ahead and mount those on. We are just going to leave these hands tight for now to allow for any adjustments we need to make when we go ahead and try to mount our bumper. Now that we have this one on this side, we're going to go ahead and do the same thing for the other side.Alright, guys, so now we've got our bumper on the table and we're going to go ahead and get everything onto it that we need to before we get it onto the truck. So we're going to start with the wings of our bumper. Now these do come folded in for shipping purposes, but when you get it, we can go ahead and begin by folding these out. Now there is a bolt retaining these in, you can go ahead and take that out and discard it. They're loose, they don't require hardware to remove. We'll go ahead and fold these out. Then inside you will find two 16-millimeter bolts and 18-millimeter lock nuts on each wing. They are loose as well. We're going to snug those down. We're not going to fully tighten them yet because we may need to adjust them once we get it on the truck. So, now we'll tighten these two bolts down. We're just going to snug them for now with our 16-millimeter socket on our ratchet and our 18-millimeter wrench. Again, just snug, not fully tight. Then we'll go ahead and do the same thing for the other side.So, next up, we're gonna come inside to our wing mount here and add two of our 16-millimeter bolts with lock washers and flat washers to the inner mounting points of our wings. So, we'll go ahead and do that. Now, once we've got those in hand tight on this side we'll go ahead and do the same thing for the other side. So now we're going to go ahead and attach our upper wing panels and you want your taper flare to go around your headlight to match up with the corresponding side. These don't have a D or a P but if you were to look at it each one is going to match up with your headlight so we'll go ahead and attach these. We're going to grab three of our 4-millimeter Allen head bolts along with lock washers and flat washers for each one. Go ahead and get these in place. And you have three mounting holes here and we'll line those up. And your upper wing panels do have threaded nuts welded onto them. Just thread right into those. And you want it to line up right with the end of your lower wing.Now, once we have this one attached, we'll go ahead and do the same thing for the other side and then we'll get them tightened down. So, now that we have all of our hardware in place we can go ahead and grab our 4-millimeter Allen head socket on our ratchet and tighten these down. Now your kit does come with a 4-millimeter Allen wrench, just a little bit easier to tighten them down if you have an Allen socket and a ratchet but the other one will do. And once we have these tight on this side, we'll go ahead and do the same thing for the other side.So, now we can get ready to install our fog lights onto our bumper, but first, we're gonna have to get our brackets installed. So we're gonna grab our fog lights, and you'll notice they have these slots down in here on the fin side, and that is for our provided mounting nuts, which we're gonna have to drop down in there, and they are slotted to hold the nuts in place as we install our hardware to mount the bracket. So we're gonna go ahead and get these in place. So we'll go ahead and hold our fog light at an angle like so, grab our nut, let that fall into place. At times, it won't be right on the first go. And then once you have it like that, you can work it back to where it should rest for the hardware and we'll go ahead and do the same thing for this side.Once we have that in, go ahead and get our bracket in place. And usually, a nut on one side is in far enough, and you can get the bracket close to it. And we'll let the other nut fall into place. We'll get that lined up and we'll grab our provided 5-millimeter Allen head bolts, go ahead and get those in. We're going to leave them loose for now so we can get our bracket mounted to our bumper and then we'll tighten everything up once we have it aligned. So now we'll go ahead and get our fog light and bracket into position on our bumper. Get our provided 13-millimeter bolt, lock washer, and flat washer through the bracket, like so. Then we can install our nut on the other side. And you'll also notice the bracket has these little bump outs to hold the nut in place. So, now that we have it loosely where we want, we'll go ahead and snug it down, check our fitment and alignment, and then we'll go ahead and fully tighten both of them.Now we'll go ahead and get our fog light pretty much set depth-wise where we want it sitting out of our bumper mount. We're going to try to keep it lined up directly with the table below us because that's going to be facing straight forward obviously. Then we'll go ahead and tighten that down with our 13-millimeter socket on our ratchet. You may need to clock it just a little bit. Once we have that set, we'll come in and tighten down our Allen head bolts for our up and down. Now, we'll grab our 5-millimeter Allen head socket and ratchet and tighten down our side mounting bolts. And for this other one here, you may need to grab a smaller Allen wrench to go ahead and tighten that one down. So, we'll do that now. So now that we've got our fog light mounted on this side and everything tightened down, we'll go ahead and repeat the same process for the other side.So, now we're ready to get the bumper attached to the vehicle. So we've got our bumper lined up with our bumper side brackets located to the inside of the vehicle side brackets. So, we'll get those in line and then we'll attach them with three of our 16-millimeter bolts, lock washers, and flat washers on the inside, and flat washers and 16-millimeter nuts on the outside of the brackets. And we'll do that for both sides. Now, we'll go ahead and get our brackets lined up and get our hardware in place. Once we have our hardware in on this side, we'll go ahead and add our flat washers and nuts on the outside and then go ahead and repeat the same process for the other bracket.So, now that we have our bumper loosely attached to the vehicle, we're gonna go ahead and begin by tightening down our factory crash bar nuts. So, we'll grab our 14-millimeter socket on our ratchet and get those secure. Then we'll go ahead and do the same thing for the other side. So now we're gonna get our bumper fit closely into position and then we'll snug down our mounting hardware here and then we can make our final adjustments a little bit easier and then we'll fully tighten them down. So we're gonna grab our 16-millimeter socket and 16-millimeter wrench and go ahead and snug these down. Now that we have these snug, we'll do the same thing for the other side. So now we can go ahead and fully tighten down our wing mounting bolts. So we're going to grab our 16-millimeter swivel socket on our ratchet and tighten down the two inner bolts that we installed previously on the inner mounting bracket for the wings. It's kind of hard to see but it is the ones right next to your frame mounting brackets here. So, we'll go ahead and tighten those down.Next, we'll go ahead and tighten down our two pivot bolts for our wings and those are the 16-millimeter bolts with 18-millimeter nuts. So we'll grab our 16-mill swivel socket and our 18-mill wrench and tighten those down. We'll go ahead and do the same thing for our bottom one. And once you have this process complete for this side, you can go ahead and do the same steps for the other side. So now we can get ready to install our splash guard. And we have these threaded clips here and they're going to go on these four mounting points along the front of the bumper. We'll go ahead and get those in place now. And you want your threads to be facing up in towards the bumper. Push those on. It's lined up.So, now we'll go ahead and get our splash guard in place. Now it is going to utilize these two frame holes here. So we've got our long 16-millimeter bolts with flat washers on. We're going to get those through so it'll kind of hold our splash guard in place so we can get our front hardware in. Next, we can go ahead and begin getting our 5-millimeter Allen head bolts with lock washers and flat washers in place to our threaded clips. So, now we can go ahead and add our flat washers and lock nuts to our through bolts here for our splash guard mounting. So we'll go ahead and do that now. Now we'll get our flat washer in place, followed by our lock nut. Now we can go ahead and do the same thing for the other side, then we'll come back and tighten all of our hardware down. So now we can go ahead and tighten our bolts down with our 18-millimeter socket on our impact and our 19-millimeter wrench.Next, we can go ahead and tighten down our Allen head bolts with our 5-millimeter Allen head socket on our impact. So, now we can go ahead and get our fog light harness installed, so we're going to start here at the battery. We're gonna remove the nut from our positive terminal here with our 12-mill socket on our ratchet. This one is loose, remove it. Then we're gonna install the positive ring terminal for our harness, like so. Reinstall our nut. We'll tighten that back down. Next, we'll go ahead and install our negative side. So, we'll grab our 10-mill socket on our ratchet go ahead, and remove our negative terminal nut. And reinstall our negative side ring terminal here. We'll go ahead and reinstall our nut. Get that tightened down.Now this harness does come with a relay that does have a mounting tab attached to it, so you can find a spot to maybe use a self-tapping screw or a nut and bolt and mount this up however you want it and clean it up and make it look however you like. For demonstration purposes, we're going to leave ours unmounted for now, but the choice is yours. You can make it your own. Just know it's a simple self-tapping screw or a nut and bolt, wherever you can find a place for it. So, next, we have to get our switch through the firewall into our cab so we can mount it to be able to access and turn our lights on and off whenever we would like. So, what we're going to do is come to this grommet here right beside our brake booster.Now you can kind of pull this grommet out of its seat a little bit and allow yourself enough room to either push the switch through to the cab or you can unplug it from the harness and push the connector through from the cab to the engine bay, whichever you find easier, they're both pretty much going to be the same process. So, we're going to go ahead and do that now. So now we've got our switch unplugged from our harness and we're actually going to push the connector through from the cab to the firewall. And the grommet on this side is located behind your carpet, right behind your inner fuse block/wiring harness. It's kind of a really hard space to see, but if you run right here along your left foot kick pannel you can follow that straight up to where your grommet will be. Push that down a little bit and go ahead and push this connector through.All right. So now we're back out to the engine bay and as you can see, we've got our connector pushed through. And so we're gonna grab that and go ahead and pull through on some, but we are gonna leave enough slack in the cab to be able to mount our switch where we want it. We'll show you that in a second. So, we'll go ahead and reconnect our connector. Just plug that right back in, like so. Then we'll go ahead and mount our switch and then we'll get our lights plugged in. So, we've got our switch here and it's got an adhesive backing, so we're going to go ahead and remove that protector. And we're going to stick ours right by our hood release latch. Now you can choose to put this wherever you'd like. Again, the choice is yours, make it your own. But for demonstration purposes, we're just going to stick ours right here. Let's see if it has an on-off function. Easy access, out of the way.So now we've got our fog light connectors, and we're going to run those behind our radiator support, tuck our excess down in here. And we're going to run our connectors through this opening here for the AC lines. Pull them through. Make sure we have enough to plug in both lights. So, now we'll grab our passenger side connector, come over here to our passenger side fog light. Grab our wire, go ahead and plug these in. Then we'll go ahead and do the same for the driver's side. So now we're going to secure our extra wiring up out of the way with our provided zip ties. Go ahead and secure this, like so. Then we can trim our excess off with angle cutters. So, again, this part for your wiring and securing it out of the way is kind of a freedom to do what you want. You can tuck it up however you'd like, make it flush, secure it however you'd like, the choice is yours. Your kit does come with zip ties however, you can just use those. Just make sure your excess wiring is away from any hot or moving parts as you don't want to damage your harness or anything in the vehicle.Next, we can go ahead and reinstall our grille. We'll get that back into place, line it up with our mounting points, just like so. Then we'll go ahead and reattach it with our factory hardware. So, first is gonna be our two plastic push pins on each side, followed by our two 10-millimeter mounting screws up top here. Then we'll go ahead and tighten those down again with our 10-mill socket on our ratchet. So, now we're gonna need to trim our fender flares so that they can match up with the line of our fender here and our bumper. So what we're gonna do is take a piece of painter's tape and match up with our line for our fender. I'm gonna go ahead and grab a razor knife and we're gonna trim down our flare. A little pro tip, this works a lot better if your razor is actually hot. Clean up our little burrs here. We'll go ahead and do the same thing for the other side.Then you can go ahead and snap your flares back into place. So, one thing to note here is that you will need to either remove or trim your fender liners up to your body line in here. There's a seam you could follow to make it more of a flush fit. The choice is up to you. For demonstration purposes, we are not going to be cutting into our fender liners, but you at home, if you want to just trim it so it's flush or if you want to remove it, the choice is yours.Alrighty, guys, that about wraps up our review and install of our Bard Front Bumper for your '16 to current Tacoma. Thanks for watching. And as always, for everything Tacoma, keep it right here at extremeterrain.com.
View Full TranscriptNow Playing

2016-2023 Tacoma BARDE Front Bumper Review & Install
33:41
Subscribe: New Tacoma videos daily!
Subscribe to our YouTube Channel
Features, Description, Reviews, Q&A, Specs & Installation
| Bumper Type | Full Width |
| Bumper Material | Steel |
| Bumper Finish | Black |
| Bumper Winch Mount | No Winch Mount |
| Bumper Fog Light Fitment | Aftermarket |
| Bumper Location | Front |
Sleek and Functional. The IRONBISON BARDE Front Bumper is the perfect addition to elevate the ruggedness and durability of your off-road vehicle. Designed with a focus on both functionality and style, this heavy-duty bumper is built to withstand the toughest terrains and protect your Tacoma from any potential hazards. This bumper comes with a pair of fog lights and has provisions for a 30-inch LED light bar. It has a sleek and aggressive design that provides added ground clearance, ensuring that you can navigate even the most challenging trails with ease.
Maximum Protection. The IRONBISON BARDE Front Bumper is engineered to provide maximum protection without compromising on style. This heavy-duty steel bumper features a powder-coated finish that not only adds to its aesthetics but also provides excellent protection against rust and corrosion.
Installation. Putting this Front Bumper on your ride is easy and requires no drilling.
Warranty. There is a limited 5-year warranty for this product.
Application. This IRONBISON BARDE Front Bumper fits all 2016-2023 Toyota Tacomas.
CA Residents:  WARNING: Cancer and Reproductive Harm - www.P65Warnings.ca.gov
Installation Info
Installation Time
(approx) 3 Hours
Difficulty Level:
Light to Moderate mechanical skill required.
Installation Guides
No guide available for this part yet.
What's in the Box
Sponsored