
How to Install Barricade XHD Bull Bar w/ Dual Row LED Light Bar - Black (07-18 Wrangler JK) on your Jeep Wrangler
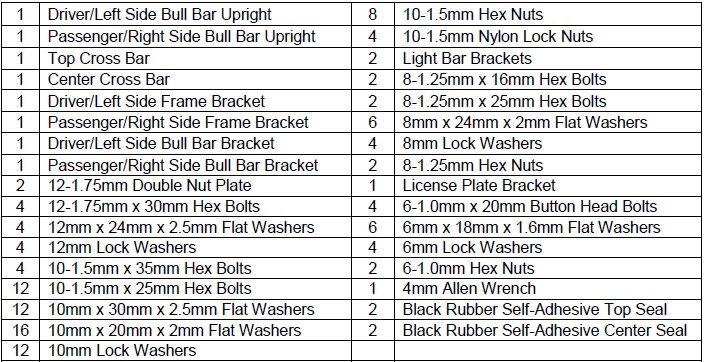
PARTS LIST:
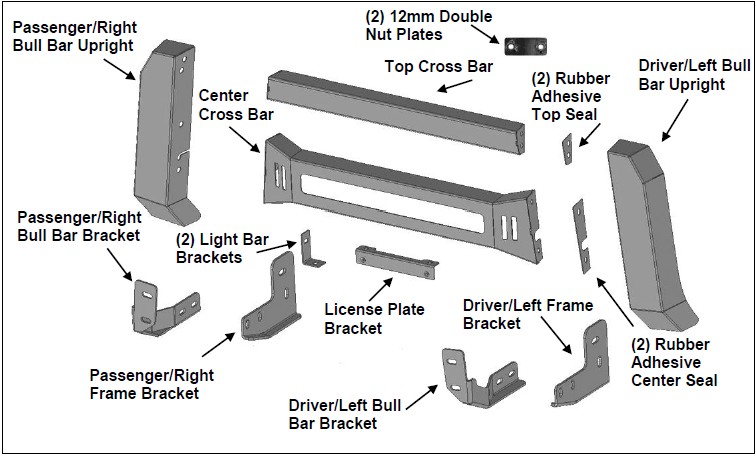
PROCEDURE:
1. REMOVE CONTENTS FROM BOX. VERIFY ALL PARTS ARE PRESENT. READ INSTRUCTIONS CAREFULLY. CUTTING IS REQUIRED. ASSISTANCE IS RECOMMENDED.
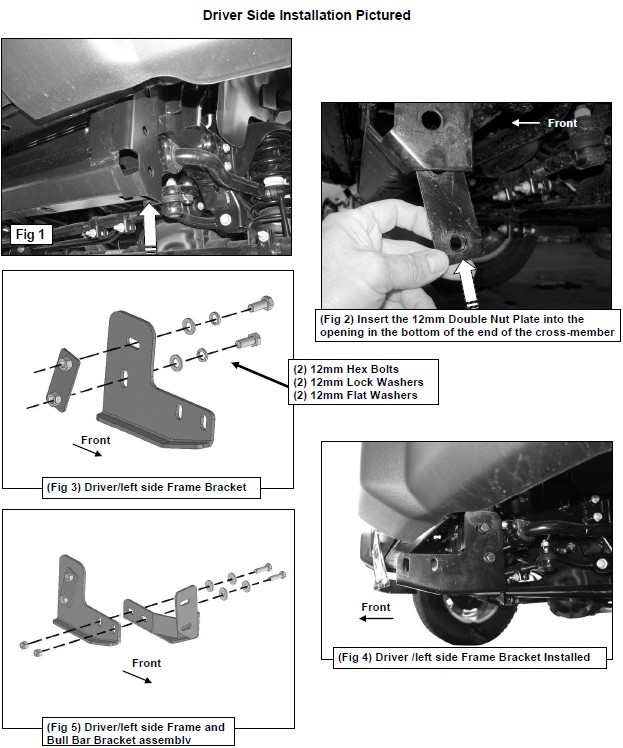
2. Remove the plastic splash guard from under the front bumper and place it on a clean, stable work surface, (Figure 1).
3. Starting on the driver side, insert (1) 12mm Double Nut Plate, (Figure 2), into the opening in the end of the frame cross-member. Line up the (2) holes in the Nut Plate with the (2) holes in the frame.
4. Select the driver side Frame Bracket, (Figure 3). Insert (2) 12mm x 30mm Hex Bolts, (2) 12mm Lock Washers and (2) 12mm Flat Washers through the (2) rear slots in the Bracket, cross-member and into the Double Nut Plate, (Figure 4). Leave hardware loose at this time.
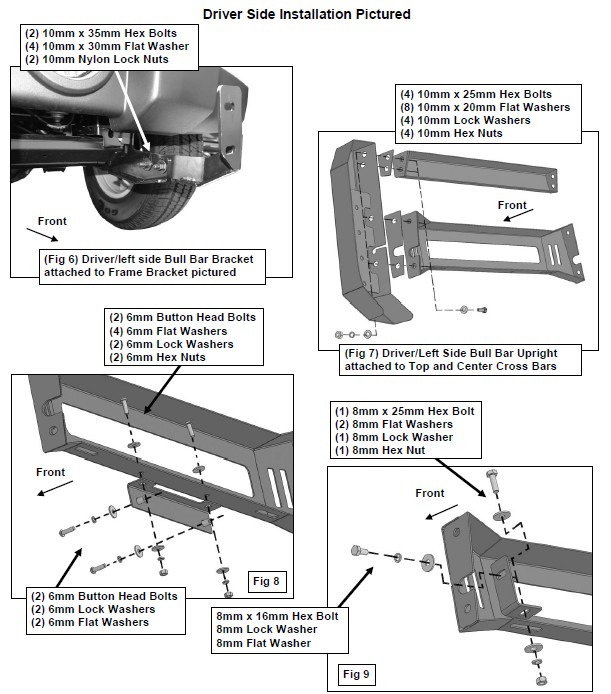
5. Select driver side Bull Bar Bracket, (Figure 5). Position the Bull Bar Bracket on the outside of the Frame Bracket. Use (2) 10mm x 35mm Hex Bolts, (4) 10mm x 30mm Flat Washers, (2) 10mm Lock Washers and (2) 10mm Hex Nuts to attach the Bull Bar Bracket to the Frame Bracket, (Figure 6).
6. Repeat Steps 3-5 for passenger side Frame and Bull Bar Bracket installation.
7. Select the driver side Bull Bar Upright and the Top Cross Bar. Attach the Black Rubber Self-Adhesive Top Seal between the Upright and Top Cross Bar. Bolt through the Top Cross Bar, Self-Adhesive Top Seal and Upright using (2) 10mm x 25mm Hex Bolts, (4) 10mm x 20mm Flat Washers, (2) 10mm Lock Washers and (2) 10mm Hex Nuts, (Figure 7). Do not fully tighten hardware.
8. Select the Center Cross Bar. Attach the Black Rubber Self-Adhesive Center Seal between the Upright and the Center Cross bar. Bolt through the Center Cross Bar, Self-Adhesive Center Seal, and Upright with (2) 10mm x 25mm Hex Bolts, (4) 10mm x 20mm Flat Washers, (2) 10mm Lock Washers and (2) 10mm Hex Nuts, (Figure 7). Do not fully tighten hardware.
9. Repeat Steps 7 & 8 to attach the passenger side Bull Bar Upright to the Top Cross Bar and Center Cross Bar. Place assembled Bull Bar face down on a clean flat surface and fully tighten top and center cross bar to upright hardware only at this time.
10. Relocation of front license plate is not required, but strongly recommended.
a. Attach the License Plate Bracket to the Center Cross Bar with (2) 6mm Button Head Bolts, (4) 6mm Flat Washers, (2) 6mm Lock Washers and (2) 6mm Hex Nuts, (Figure 8). Use the (2) 6mm Button Head Bolts, (2) 6mm Lock Washers and (2) 6mm Flat Washers to attach the front license plate to the Bracket, (Figure 8).
11. LED light installation available on Center Cross Bar as supplied with Bull Bar or sold separately.
a. Start at the driver/left side of the vehicle. Select (1) LED Bracket. Attach the slot on the short side of the Bracket to the slot on the center cross bar with (1) 8mm x 25mm Hex Bolt, (2) 8mm Flat Washers, (1) 8mm Lock Washer and (1) 8mm Hex Nut, (Figure 9). NOTE: The short side on the LED Bracket must be facing the center of the vehicle.
b. Repeat Step 11a to install LED bracket on passenger/right side.
c. Use (1) 8mm x 16mm Hex Bolt, (1) 8mm Lock Washer and (1) 8mm Flat Washer to attach the slot on the long side of the LED Bracket to the LED light bar, (Figure 9). Repeat this step to attach the LED Bracket to the LED light bar on the passenger/right side of the vehicle.
d. Follow the light manufacturer’s instructions to attach the LED light bar and properly wire.
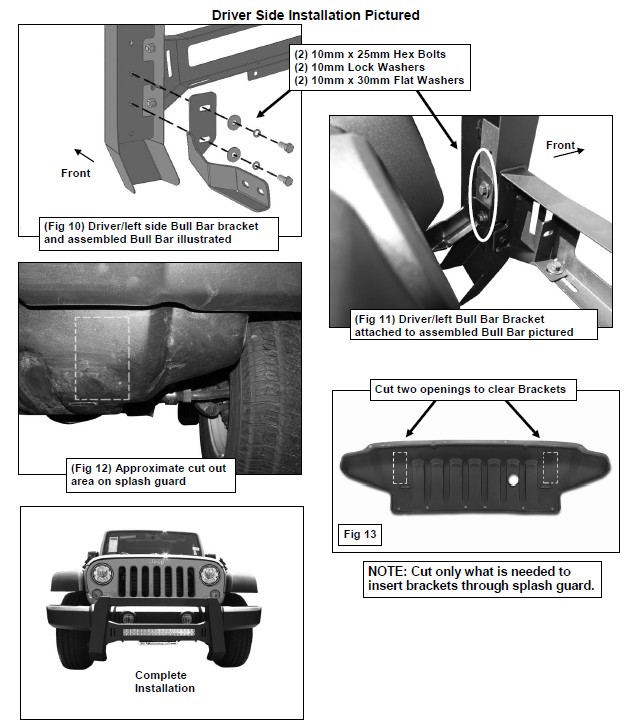
12. With assistance, position the assembled Bull Bar up to the Bull Bar Brackets. Use the included (4) 10mm x 25mm Hex Bolts, (4) 10mm Lock Washers and (4) 10mm x 30mm Flat Washers to attach the Bull Bar to the Bull Bar Brackets, (Figure 10 & 11). Do not tighten hardware at this time.
13. Align the Bull Bar properly and fully tighten the Frame Bracket hardware only. Temporarily remove the assembled Bull Bar with the Bull Bar Brackets attached.
14. Position the splash guard back up to the vehicle and attach with the factory hardware. Trace the location of the Brackets onto the splash guard, (Figure 12). NOTE: To maintain the integrity of the plastic Splash Guard, remove only material necessary to clear the Bull Bar and Brackets. Make small cuts and check the fit often before final installation, (Figure 13). After the appropriate cuts are made to the splash guard, reinstall the splash guard with factory hardware.
15. Reinstall the assembled Bull Bar with the Bull Bar Brackets and tighten all hardware.
16. Do periodic inspections to the installation to make sure is secure and tight.
To protect your investment, wax this product after installing. Regular waxing is recommended to add a protective layer over the finish. Do not use any type of polish or wax that may contain abrasives that could damage the finish. Mild soap may be used to clean the Bull Bar.
