2020-2025


Installation Time
(approx) 2 Hours
Difficulty Level:
Light to Moderate mechanical skill required.
Installation Guides
 FREE 1 to 3-Day Delivery on Orders $119+ Details

Add Details


Change Vehicle Color In Photo
Select Your Color
Verify parts fit & get product recommendations
M-F 8:30A-11P, Sat-Sun 8:30A-9P
 500+ Reviews
1 Answers
500+ Reviews
1 Answers
$624.99 each
Will this fit your Vehicle?
Saved - View your saved items
We're sorry. We couldn't save this product at this time.
or use
Add Local Installation
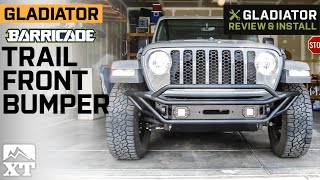
Noah: Hey, everybody. It's Noah with Extreme Terrain. On the table in front of me, we've got the Barricade Trail Runner front bumper with the LED fog lights, fitting the 2020 and newer Jeep Gladiator JT. Now, this bumper is going to be a great choice for the Gladiator owner who wants some more lighting, some front end protection, and the opportunity to attach some more utility.Just at first looks with this bumper, it's a really low-profile option, and I tend to really like that. Now, this bumper does stand out a little bit on the stock Gladiator, and it really grabs your attention. So if you're looking for that, this is a good choice as well. Now, this bumper looks trail-ready, and I think that's a good thing, too.The next thing I want to talk about is the fact that we've got two LED fog lights here that mount on the front of the bumper, and they are included with the kit for some extra lighting, as well as mounting spots for two D-rings here in the center, right there. In the grand scheme of things, usually aftermarket bumpers are installed to give the vehicle some better protection on the trail, or just even on the road for daily fender bender protection. This guy is really beefy, and most of that comes down to the tubular design overall, which is going to be really strong, a lot stronger than just something out of formed steel.Now, like I said, this is a tubular design, and all that tubing is pretty heavy-duty steel, and this isn't just a huge piece of sheet metal with poor fit and finish. There's actually a lot of detail integrated into the bumper and the construction overall, and ultimately, it's going to come down to the way the tubes fit together. Now, this is the same idea as a roll cage, guys. The structure is really stout, and the provisions for the winch here on the front are able to support a 12,000-pound unit, and the D-rings are rated to 9,500 pounds a piece. Now, those two LED fog lights that come with the bumper are 6,000-kelvin, and they're IP67 rated as well, so they're seriously heat and water resistant.Everything across the bumper, from the brackets to the screws that are included are powder coated and textured black, and that's going to ward off any rust or corrosion. Overall, I would say that this is a really well-constructed bumper, and it's going to be a perfect option for the Gladiator owner who needs some reliable utility.This barred bumper falls right around $680, which does fall a little bit higher than some of the other bumper offerings on the site, but what you're getting for the larger price tag is that added utility, and the provisions for a really heavy-duty winch.Looking at the install aspect of this bumper, it has an install difficulty of two out of three wrenches, and two hours for the install time. There really isn't a whole lot to worry about on the install side of things because next up, we actually have an actual XT customer who took the time to walk you through all the steps of installing this bumper on their own Gladiator.Customer: The tools needed for this job are the panel removal tools to remove the clips on the stock bumper, a breakover bar for the stubborn bolts, the provided Allen key for the skid plate bolts. We have our socket wrenches, we have 16 and 18-millimeter sockets, a socket extension tool, and then we have 7 and 8-millimeter sockets, an 11-millimeter socket to help get the Allen bolts on for the skid plate, and then we have a flat head screwdriver for the wiring harness for the fog lights.The first thing that we're going to do is remove all these little plastic fasteners. There's a bunch of them all over the top of the bumper, and then there's a bunch down here at the bottom too, that we're going to be taking off with our panel removal tool. These fasteners can be a little bit tricky. You may want to use a screwdriver. You can always use these panel removal tools, too. It just really takes a lot of patience to wiggle these things out of here.There we go. All right, one down, too many to go. I'm going to try to take all the front ones off first. I'm wondering if I do that, if this front piece coming off is going to make it a little easier to get to these back ones. They're kind of hard to get to with a tool, so here's hoping.Okay, and there are some back here. If you have a curved tool, like the one I'm using, flip it over every now and then. Sometimes you'll get a better angle when you flip it over. The ones on the bottom are a different type of clip, so you may want to try one of your other removal tools.All right, I had to switch over to some metal pry bars to get these bottom ones out. The plastic ones were just bending too much, and I wasn't able to get enough leverage. There's just not a lot of room down here. Luckily, we don't have to reuse these.The safety glasses are kind of nice during this step. If you're like me, you don't wash your Jeep too often, and there's a ton of dirt here. So when these pop out, you get a bunch of dirt that just comes out all over your face, and in your eyes. Not fun.All right, there's just a few of those in that bumper, but we managed to get them all out. All right, some of these are really hard to get to with the pry tools, but since we're not removing them...or reusing them, I'm going to go ahead and drill them out just to make it a little easier on us.All right, all those clips are out. On to the next step. There are some 8-millimeter bolts down here that are holding everything else on. Now that I've got the rest of the clips out, I'm thinking the bumper is just going to come off, after I take these off.With those bolts removed, the splash guard comes out. Now it looks like we can get just to the rest of the bolts to get the whole bumper off.All right, the fog light removal is a little tricky. One trick right here that you can do, this piece is on just a little tab that's connected to the frame. If you slide it off, you're going to have a little bit more wiggle room to work with. And then what you're going to do is take a screwdriver, and there's a little tab over here, you can see it right there, and you're going to want to press that tab while pulling, and then that will take it off of there. Mine had a little dirt in it, so it was a little hard to get off.There's eight 18-millimeter nuts on the backside of this bumper. Those have to come off, and that is what will get the bumper off. They're both on each side of this kind of brace here, so you'll need an extension to get back in there for sure.I only have about eight more bolts holding this thing on. They're right behind here. A little bit of penetrating oil, and a longer socket and an extension, and probably even a breakover is not a bad idea for these. They're kind of tucked up in there pretty good.All right, taking the fog light harness off is a little tricky. There's actually a tab right here, if you can see it, and this piece is attached to it. It slides on, but it's actually easier if you take that off, and then you've got a little bit more working room right here. You push this tab right here, and just pull this piece out to get them taken apart.One of the more difficult parts for me with this whole install was actually just getting this harness apart from the fog light. I found it a lot easier, once I took it off this tab that is sitting here just on this bumper connect piece, and then you push down on this tab, on the side, and it just slides apart at that point. Now that we have all those clips off, and we have these smaller bolts down at the bottom out, we now can take the actual bolts that are holding the bumper off. They're right behind this area here, there's four of them on each side. They're 18-millimeter sockets, or 18-millimeter bolts, and they're kind of tucked back in there pretty good. So what we're going to want to do is probably use some penetrating oil, and then an extension, and it doesn't hurt to use a breakover bar either, just like this one. It gives you a little bit of swivel here. That's going to make it a whole lot easier to get off, I think. So, let's give that a try.These are two of the last four bolts that still need to be taken off, and then we can just take the bumper right off.While you're down here, it's not a bad idea to just inspect your undercarriage. These are pretty long bolts, so it takes a minute to get these nuts off of here.I just took the four bolts off there, behind right here, and then another four right here, so there shouldn't be anything else holding this bumper on anymore, and it should just come right off. I'm just going to grab it by the tow hooks here, wiggle it up, there it is.Next, we have four 16-millimeter bolts that we're going to remove to remove these inner and outer brackets on the bumper.Once you have those bolts loosened up, you can actually just slide these brackets off of here, so you're not busting your knuckles.Now that we have the brackets removed, we're going to remove the two 16-millimeter bolts that are holding the skid plate on.Hopefully this just lifts right off.All right, next, to get the winch plate installed, we're supposed to set this between the frame here. There's a couple spacers, and I'm not real sure exactly how those go on yet. Here they are. One's an 8-millimeter, it goes on the driver's side, and then there are some 3-millimeter, two 3-millimeters are going on the passenger side. I'm not real sure how those go on, but probably it will make more sense once we get this winch plate in here.All right, this is a little tricky, so you probably need a helper on it. You've got to get this 8-millimeter spacer in here, and meanwhile, bring this bolt through.All right, and we have our flat washer here, our lock washer...I'm going to thread this bolt in here. The spacer is loose, so I'm not quite sure how it's supposed to be positioned in here. I'm guessing maybe like that. All right, you definitely are going to need a set of helping hands on this one. Here, scoot that way just a little bit.All right...okay, I think you can let go. All right, now we're threading in the top bolt washer and lock washer. Those are all M10. The bolt is 30 millimeters long. You do all this after you stick those longer bolts and nuts in the bottom holes.All right, next up we're going to take four M12 x 35-millimeter stud plates. Those look like that, and we're going to attach them right here. They're going to be held in place by these little plastic kind of stud holder things. And then, we are going to try to shimmy this onto the vehicle after this. So, let's put it back where we found it. [inaudible] All right, and we'll just do that for the other side.All right, next we need to add these spacers on. I'll go ahead and put my flat washers and lock washers on too, before lifting it into place.[inaudible] that just goes right there.All right, it's kind of tricky getting these all lined up. Can you tip this back like that.Helper: That far?Customer: Yes.All right, with all these bolts that are holding this on, you have to be really patient with them. You don't have a whole lot of wiggle room, they're not quite long enough. So just barely get them until they catch, and then try to do the bottom ones. I started with the top. This probably took me a good half hour, just to get these bolts lined up. I'm about to get them tightened down, and hopefully the rest of this isn't as difficult.All right, now that we've got the bumper on, we're going to go ahead and switch gears and take it over to lights. So, there are two LED fog lights included with this bumper. To put these on, you're going to use some Allen bolts and some nuts. Those are going to be M6 nuts and M6 Allen bolts, there's four for each one of the lights. So, let's go ahead and get those on.I'm going to thread that through there... I'm just going to pop all these through here, just to hold it in place.I'm getting all these bolts started on here.So, you shouldn't need a socket wrench. These have the little grooves in the bottom that will catch whenever you're tightening them. So just as long as you have them pretty tight, finger tight, you should be able to just use your Allen wrench to tighten them up the rest of the way.The fog lights come with a wiring harness. You can see right here it's got the relay, and then it's got the terminal connects here. I'm going to go ahead and connect the positive up to this unused terminal here, and then I'll go ahead and connect the negative over there, on that side.It had a 12-millimeter socket over here for that terminal. I'm probably going to have to swap that out. The other terminal over here is actually a 13-millimeter socket, so I'm going to need another socket over here. So, this terminal is 10 millimeters. Never mind, that's holding the terminal on.I feel like I should have had to use a breakover bar there, but that was on there really tight.All right, I'll probably end up connecting that right there. I need a screwdriver for that.All right, I debated on where to put this little relay. There's a few points I could put it. This seems to be the easiest. I will have to take it off every time I change my air filter. Probably not a big deal, though, so I'm going to go ahead and just tuck it here.That was a long screw.Okay, I'm going to try to figure out how to get these wires through here. I know I don't want them near any sort of heat source, you know, exhaust components, or radiator. There is a hole right here, kind of behind the grille. I could probably secure them up under this little rubber gasket that goes to the air box. I think I'll be clear of the hood. And I'll probably come back in here, and use some zip ties to kind of clean this up a bit.It may be easier just to take the whole grill off, but we'll see.All right, these are going to be coming out, kind of on the left side of the headlight. I'll show you that in a minute.All right, you can see how I threaded these down from the engine bay, just out under here, under the grille. There is a whole, whole lot of wire here. I'm thinking I'll probably end up shortening that, just to keep everything nice and clean.The fog lights come with a switch that you can run through your firewall. You'll see it has a little on and off button here. There's a little plug down here, I don't know if you can see it. It's right here, on the left side...or right side of the firewall, just about probably four inches down from this bracket here. All you need to do is just take a pair of pliers and pop that out, and then you can just drill a hole however big you need, and put a grommet on there, or use some silicone to seal it back up.The last step to this install is installing the skid plate underneath the vehicle. You're going to need the skid plate, your brackets, and then some bolts. You'll need the original hardware from the skid plate for this one. What we're going to do is loosely install them here and there, where the original mounting points of the factory skid plate were.All right, next we are going to install the skid plate using five M6 x 20-millimeter Allen bolts, five lock washers, five flat washers, and four M6 nuts to secure the skid plate.The middle is pretty threaded, so I would start with that one, to hold it in place, and then we'll go around to the rest of them, and tighten those up.All right, I'm going to hook the bottom of the skid plate into the mounting brackets that are attached to the original mounting holes.You can use an 11-millimeter crescent wrench on this one.Noah: That was the Barricade Trail Runner Front Bumper with LED Fog Lights, fitting the 2020 and newer Jeep Gladiator JT. For all things Gladiator, remember to keep it right here at ExtremeTerrain.com.
View Full TranscriptNow Playing

Jeep Gladiator JT Barricade Trail Runner Front Bumper with LED Fog Lights Review & Install
40:29
Subscribe: New Gladiator videos daily!
Subscribe to our YouTube Channel
Features, Description, Reviews, Q&A, Specs & Installation
| Brand | Barricade |
| Bumper Type | Tube |
| Bumper Material | Steel |
| Bumper Finish | Black |
| Bumper Winch Mount | Winch Mount |
| Bumper Fog Light Fitment | Aftermarket |
| Bumper Location | Front |
Please Note. This Barricade bumper supports up to 10,000 lbs. of flat-tow capability using the included D-Rings or integrated tow hooks.
Barricade J145270
CA Residents:  WARNING: Cancer and Reproductive Harm - www.P65Warnings.ca.gov
Installation Info
Installation Time
(approx) 2 Hours
Difficulty Level:
Light to Moderate mechanical skill required.
Installation Guides
What's in the Box
Review Summary


Installation Time: Afternoon
Apr 20, 2025

bumper
nice bumper the problem is the mounting bolts are way to short had to buy all new ones please correct this
May 6, 2024
Great product can’t wait to load it up!
The received item was packaged very well and had more than enough screws…lol.. the video was very helpful that is posted on the item page.
Mar 25, 2024
Great Product
Install was easy and love the look. Can't beat this bumper in this price range
Feb 5, 2024
Great fit
Install was pretty straight forward as most bumpers are. The skid plate is thin and would not work with my factory steel skid plate on the mojave, winch sits down in for a sleek look.
Jul 27, 2023
Barricade Trail Runner front bumper
So far I’m enjoying the bumper - it weighs 80th lbs so not quite as heavy as others in its price range, the tubular styling is what I was going for with my Gladiator build. Included LEDs seem bright (wired them into the factory fog light harness) and the skid plate and winch plate seem sturdy. The bumper does leave a good sized gap between the grille and bumper - I’m not going to put a winch on and didn’t love seeing a giant gap and some exposed frame there so I ordered a Mopar trim piece for $50 to make it look a bit more finished. I don’t think it would be an issue if you’re running a winch that’ll take up some of that empty space in front of the grille. The instructions are nearly useless, as the parts they reference aren’t actually pictured/identified in the guide. Took some guessing but I figured it out. Slowed me down some though.
Feb 27, 2023
Looks amazing. Needs slightly better instruction
Would help if the bolts and everything were separated and labeled. But once it's on there it looks awesome.
Apr 26, 2025
Review shared from Barricade Trail Force HD Front Bumper (20-25 Jeep Gladiator JT)
looks good
had some trouble with the fog lights because the screws kept getting messed up and wouldn't fit in the holes. thinking the bumper was threaded and then coated. but it was an easy fix
Apr 8, 2025
Review shared from Barricade Trail Force HD Front Bumper (20-25 Jeep Gladiator JT)
Great bumper
Great bumper! If you need install video and look on google or here it’s not the updated version. They have another version for a wrangler (it’s the same process at gladiator) that will save you a bunch of headaches. After watching the video install was straight forward!
Mar 30, 2025
Review shared from Barricade Trail Force HD Front Bumper (20-25 Jeep Gladiator JT)
Bumper looks good, but install a B&@^h
The bumper itself is well made. Looks are great. The problem is they powder coat the treads and the screws are very cheap for the fod light install. IMO thats why they dont show fog light install in the installation video Extreme Terrain provides. They are not strong enough to cut the powder coat. Expect a stripped screw or two. Bolts for bumper are to short to use with lock washers if you leave the mounting plates on frame. Alot of pushing, pulling, and loosing and tightening of bolts. But overall nice look and finish.
Mar 21, 2025
Review shared from Barricade Trail Force HD Front Bumper (20-25 Jeep Gladiator JT)
Nice bumper overall needs better install instructions
Install wasn't horrible but wish the install directions were as detailed as the original bumper removal were And the bolt on design should be alot better trying to hold the nut bolt combo in place while lining it up and installing was not easy
Sponsored