2020-2025


Installation Time
(approx) 1 Hour
Difficulty Level:
Simple installation for anyone.
Installation Guides
 FREE 1 to 3-Day Delivery on Orders $119+ Details

Add Details


Change Vehicle Color In Photo
Select Your Color
Verify parts fit & get product recommendations
M-F 8:30A-11P, Sat-Sun 8:30A-9P
 48 Reviews
Will this fit your Vehicle?
Saved - View your saved items
We're sorry. We couldn't save this product at this time.
or use
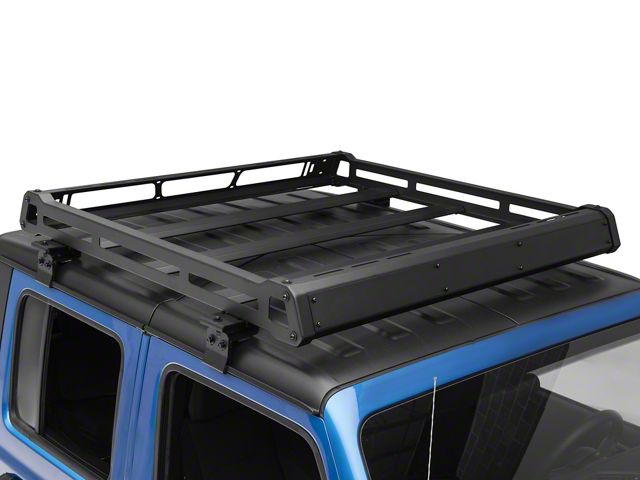
Hey, guys, this is Eric from Extreme Terrain. In this video, I'm gonna give you my review and install of this Barricade Roof Rack Basket, fitting all OEM Hard Tops on 2020 and later Jeep Gladiators. And the bottom line is you should really be checking this out if you are looking to increase the cargo capacity of your Jeep Gladiator. Now, some of you out there might be thinking, it's hard to imagine that you need more cargo capacity in a Jeep Gladiator with all that room you have back in the bed area. However, it's easy to get loaded up when you're heading out for a long camping trip or even just a family vacation and you have all kinds of stuff already in the bed. Not to mention, if you're camping, you might have a bed-mounted tent that you're using back there or other bulky equipment and you just need more room.Now, I think this kit from Barricade is really the perfect mix of price and capability. Now, what do I mean by that? With capability, you're getting an aluminum design that is rugged and does not add a lot of weight to the roof of your Gladiator by itself. Now I've worked with other roof racks here at xtremeterrain.com, and some of the roof racks themselves can weigh upwards of 100 or more pounds. That's just added weight to the roof of your Jeep. And that's gonna raise the center of gravity of your Jeep, making it less stable, whether you're driving down the road or out on a trail where it gets a little off-camber and you're tilting sideways. You don't really want that higher center of gravity. This lightweight material lowers that weight for the roof rack itself, putting it in place. I don't have the official number from the manufacturer but I gotta tell you, lifting it up in the place, I would estimate this roof rack altogether with the mounting brackets weighs roughly in the area of 30 to 40 pounds.And I've worked with other roof racks that weigh easily more than twice that. Now with that lightweight design, however, you get 150-pound cargo capacity with this. That's adding a lot of extra capacity to your Jeep. So those other designs out there that utilize steel construction, they actually don't add a whole lot more cargo capacity for your Gladiator. There are other aluminum options out there that you can check out. But like I said, this is mixing price and capability. Now, as far as the price goes with these, this kit is currently priced somewhere in the area about $725. That's not making it the cheapest roof rack out there but it's far from the most expensive. Now, if you want more than 150 pounds of capacity, there are other options out there, but you're probably gonna be looking at adding more weight in the rack itself or adding more price. Like I said, this roof rack is really in the sweet spot, in my opinion. You're getting 150-pound cargo capacity, and that $725 price, that kind of puts it right in the middle of the spectrum.The other really nice design feature that I like about this is you can remove this panel on the front here and add additional bracketry that's included with this kit, that'll help you mount up LED lighting. If you wanna add lighting up to the top, you can also add lighting to the rear of this roof rack. There are slots designed right in to give you multiple options for all different types of configurations. I think that's a really nice side benefit to this roof rack as well. Now, as far as the installation goes, I'm giving it a very basic one out of three wrenches on our difficulty meter. You're gonna have some assembly and a lot of hardware to deal with but it's nothing complicated whatsoever.And like I said before, with the light weight of this basket, one friend is all you need to really get this lifted into place. If you are really hard-pressed to do this by yourself, you probably could do that, stepping up into the bed of your truck and kind of doing it one step at a time. You could very easily lift this basket by yourself. It's just making sure that you can set it down safely without gouging the roof or dropping it, that kind of thing. It's a little bit of a large object. So all in all, like I said, one out of three wrenches on our difficulty meter and I would budget about one hour of your time to get this job done with some basic hand tools.So let's go take a look at the tools we're actually gonna need and go ahead with the installation. Okay, guys, tools we're gonna use for this install or an electric impact wrench, 5-millimeter and 5/32 Allen sockets, or you can use the Allen keys that are provided in the kit. You're gonna need a tape measure, a socket wrench, a 13-millimeter socket, and 13 and 10-millimeter crescent wrenches. All right, guys, now to begin our installation, what I've done is I've set up a large tabletop here for the sake of making a video. Obviously, most of you probably do not have a table this size at home. I get it. But if you clear out a nice area to work in your garage or maybe even your driveway, you can get this done pretty easy.So, to get started, what we're gonna do is go ahead and grab the side rails out of your kit as well as one of the end pieces. They're pretty much...they're not labeled front, rear, or left side, right side. They appear to be, you know, changeable. So go ahead and grab those. What we're gonna do is these end pieces right here, they slide directly inside the side rails just like that. So what we're gonna do is get it started. Go ahead and go grab a button head bolt, a couple of washers, a lock washer, and a nut for each. And it takes two on these end holes right here and we're just gonna throw them in by hand right now, leave everything loose as we assemble this thing piece by piece and then once we have everything kind of fitting properly and bolts started in holes, then we'll go around and tighten everything up.All right guys, now you'll notice in your kit that you're gonna have two different sides button head bolts. These are the larger of the two. Just slide them in like that and then we'll get a washer, lock washer on there. All right, we're gonna do the same thing on the other end. All right, now we're gonna repeat this for the other end cap. All right, guys, for this next step, what we're gonna do is we're gonna insert the cross-members that go on the inside of our rooftop kit here. So what we're gonna do, since we have to thread more of these button head bolts in from the underside to attach them to the side rails, I'm just gonna brace or basically lift this up with a couple of blocks so I can get underneath there. So. let's go ahead and grab those parts right now.All right, now I have all three of our cross members set up on the table here. I'm showing you the underside of this one. Just to point out, there are rivnuts, or basically riveted nuts, that are inserted into each one of these cross-members and that's what is going to hold our bolts when we thread them in from the underside. Now, with this kind of loosely assembled with the front and side rails, just kind of put this in at an angle. And then there are three pairs of holes along each side rail you see here to slide your cross-member into place and there's a little lip on those riveted nuts that will kind of drop into place in those holes as you can see there like that, help you line it up. Makes it a little bit easier. And then you go ahead and start. Grab six more of these button head bolts with a flat washer and a lock washer. And we'll go ahead and start them on this side and we'll grab six more and do the same thing on the other side.All right, guys, now I have six more of these button head bolts with washers and lock washers. You're just gonna do the same. All right guys, now grab some more of these button head bolts, washers, lock washers, and nuts. You're gonna need two more for each corner. We're gonna go in top and bottom here and here. We're gonna do that at all four corners. Now that we have all of our bolts started and all the holes for all the side rails and the cross-members, we're gonna go around and tighten them all up. All right, guys, now to tighten these down, you can either use the Allen key that's provided in the kit or you can grab a 5-millimeter Allen socket and you're gonna need a 13-millimeter crescent wrench for the nuts. Now we're gonna go ahead and go across the bottom of our cross-members. And repeat all that for the other side.All right, now at this step of the install, guys, you're gonna decide what you're going to mount on the front of your roof rack. Now, if you're gonna be putting on some lighting, it's a good time to do that now before you get this up on your Jeep. It might be a little bit easier to work on it down here. And the nice thing about this design is that there are a number of slots built into these rails. So you can basically configure all kinds of lighting for this with countless configurations. However, we do not have any lighting that we're gonna demonstrate today. So you can grab this faceplate that is included in the kit and we're gonna mount that up to kind of give it a more aerodynamic and cleaner look here. So to do that is to get it oriented so it lines up with these holes and grab these small gauge button head bolts, the kind that already have the lock washer and flat washer already mounted on them, and kind of line this up and just slide a few of these in, kind of hold up this faceplate for us. On the backside, they give you these stainless washers and nuts. We're gonna go ahead and put those on through the back. Actually, to tighten these down, I grabbed a 5/32 Allen socket and we're gonna use a 10-millimeter crescent for the backside on the nut.All right, guys now for the next step, I wanna put our clamping brackets and our mounting brackets up here on the table and kind of explain how the bracketry is gonna work. If you've done anything on the roofing of your Jeep, this is probably not gonna be all too foreign to you. You're probably gonna understand the basic concept here but it's gonna go like this. These brackets here are gonna support the rooftop basket and they're gonna sit right on top of your Jeep. And then this bottom lip here is going to rest in the rain gutter on the side of your roof panels. This clamping bracket is what's referred to in your instruction booklet is gonna come up underneath. And this threaded bolt is gonna slide through that hole. We're gonna put a nut on there and tighten that down. But this bottom edge right here is going to grab onto the bottom of the rain gutter on the side of your roof panels. And as we cinch that up, it's gonna basically pinch the roof gutter and that's what's gonna hold the whole assembly to the roof of your Jeep.Now, since we're putting this metal bracketry on top of our roof, we wanna protect the surface of our roof there from any scuffing. And the kit includes two different sizes of foam pads. There's four pieces of this thicker pad and four pieces of the thinner pad. So what we're gonna do is we're gonna take the thicker pads, and we're basically going to peel off the adhesive backing and attach them to the underside of our mounting bracket. That's the thicker to the bottom of the mounting bracket, like that. We're gonna do that for all four of the mounting brackets and then what the instructions call the clamping bracket, these pieces right here. We're gonna take this thin foam pad and basically insert in this notch right here. So it's gonna basically kind of bend in half as it goes down on there. And that's also gonna protect the rain gutter surface as we clamp these brackets together. Now, I have this one mounted in there, as you can see, kind of have it bent into the inside of that bend in the clamp and have it nice and flush along this edge here because when you go up against your Jeep, you don't want anything pushing out when it's clamped. So you can go ahead and repeat that for the rest of the brackets.All right, guys, now we're up here at the roofline of our Jeep. Now, the instructions tell us that we need to position our first mounting bracket 17.5 inches back from the leading edge of our roof panel right here, which is gonna put us right about here. Go ahead and take when you're clamping brackets, there are nylon lock nuts in there and flat washers for this. We're gonna go ahead and slide this up. I'm just gonna finger tight right now. We have two more bolts that we're gonna put in through here. There are welded on nuts on the backside of this clamp that we're gonna bolt into right there. All right, guys, now you're gonna have hardware in your kit that have these hex head bolts, and it already has a flat washer and a lock washer, kind of, permanently attached to them. That's the hardware we're gonna be using here. We just got that started by hand right now and we're gonna tighten everything down here in a minute.Now, to mount the rear mounting bracket on here, guys, the instructions call for mounting this bracket 31 inches further back from this bracket. So the slide your tape up against the bracket there, run it back to 31 inches, which we'll be right about here. Then we're gonna repeat the procedure with a clamping bracket in those two bolts like we did for the front one. Once you have these bolts kind of finger tight for right now and set go ahead and do the same measurements and mounting procedure on the driver's side of your truck.Right now, I obviously want you to have some help from a friend to get this mounted up into place. Go ahead and grab the hex head bolts here out of your kit, you should have eight of them. We're gonna have to in two and then we're gonna have the same on the other side, two flat washers, and locking nylon, nylon lock nut I should say, to bolt these down. So go ahead and just start the bolt through the top. It's a little tricky, a little tight working in there but once you get that started, just leave it loose for now and then go ahead and repeat that for the rest of the brackets.All right, now, at this point, we can go ahead and start tightening everything down. Grab a 13-millimeter crescent and a 13-millimeter socket. I used a 13-mil socket for all of these bolts here and a 13-mil crescent as well whenever I needed to hold the nut tight. So you can go ahead and repeat the same procedure for the remaining brackets. All right, guys, that wraps up this review and install of this Barricade Roof Rack Basket for all 2020 and later Jeep Gladiators with the OEM Hard Top. And of course, for all things Gladiator, keep it right here in extremeterrain.com.
View Full TranscriptNow Playing

Jeep Gladiator JT Barricade Roof Rack Basket for OEM Hard Top Review & Install
28:20
Subscribe: New Gladiator videos daily!
Subscribe to our YouTube Channel
Features, Description, Reviews, Q&A
Barricade J133620
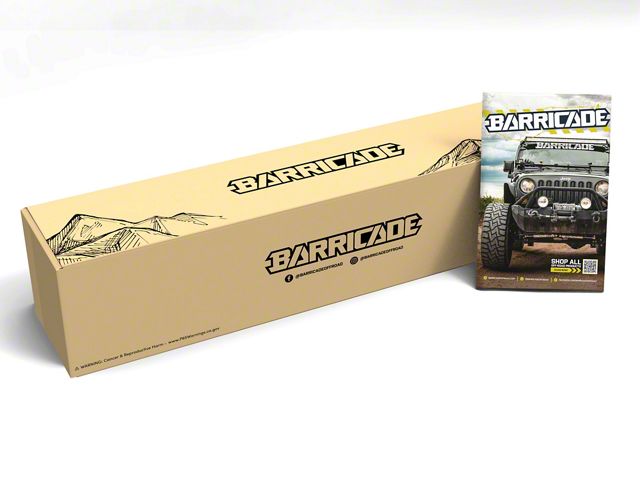
CA Residents:  WARNING: Cancer and Reproductive Harm - www.P65Warnings.ca.gov
Installation Info
Installation Time
(approx) 1 Hour
Difficulty Level:
Simple installation for anyone.
Installation Guides
Review Summary


Installation Time: Afternoon
Aug 11, 2024
Nice, substantial roof rack
Well built, and well packed. I like the low profile look. It took more than an hour to compete the project, but that's just me. Thanks for providing an installation video as a reference guide, I appreciate it. I'd recommend Extreme Terrain, and this system to anyone.
Jan 20, 2022
Roof rack
Did a lot of research this was best quality for a fair price
Dec 5, 2021
Great addition to the gladiator
If you need more room to put your stuff when you travel or do some off-roadinng, this is a great addition. Very good quality, easy to assemble and to install and doesn’t add too much weight and height to your gladiator (7 1/2 in-19.05 cm). You do not need an afternoon, but definitely more than an hour ??.
Nov 3, 2021
Excellent and a good price
Basket was pretty straight forward. Got the brackets and put them on. The most challenging was bolting the basket down, tight but do able. Would buy from these guys again. Oh .. I did, bought the Dirty Dog Pet webbing. Guess I like these guys for sure
Jun 12, 2021
In search of large cutthroat!
Great rack and very easy to install. The directions were simple. I fish a lot on remote streams and with this setup I can definitely fit my gear.
Apr 29, 2021
Say what!!??
Well, myself and my wife love this rack. We had it put together in about an “whiskey” hour. Grab a speed square from your wood working kit and some joint cream for your hands. The tools they provide will work, but you’ll be hurting. Thank goodness we have the proper ones that made this easy. No whistle no rattle. It mounts to the drip rail and does not rest on your roof. The pads are there for when you load it up. If needed. I’ve been off road with it, 4hi on some gnarly trails and it didn’t move. Be patient with your install, go slow and you’ll be happy you did. You’ll also get your steps in for the day, because you’ll be walking around your Jeep about 50 times. Overall, love the look. Didn’t use the lightbar mount and we sticker bombed the valence. Hope this helps you decide.
Mar 31, 2021
Great roof rack
Great roof rack for the price. Been out twice with it & is sturdy. Instructions were good.
Nov 14, 2023
Great roof rack
I highly recommend this roof rack, fits the drip rails perfectly and the rubber padding on the mounts cause zero damage to my paint. I have had it on the truck for almost 2 years. The powder coating on the bolts could be better as I started to recently see some surface rust on them. Overall a great buy for the money!
Apr 26, 2022
Great item
Easy to install took me 1 hour to build and to mount about 15 mins.but ready easy and need a buddy .I did it my self.
Nov 3, 2021
Great roof rack basket
Good quality racks they look good on my gladiator. I really love them.